LPI 201 Vorbereitung
Topic 200: Capacity Planning
200.1 Measure and Troubleshoot Resource Usage
Wir installieren das Paket ‚sysstat‘:
suse:~ # zypper install sysstat
Loading repository data...
Reading installed packages...
Resolving package dependencies...

The following NEW package is going to be installed:
sysstat

1 new package to install.
Overall download size: 268.8 KiB. Already cached: 0 B. After the operation, additional 1.0 MiB will be used.
Continue? [y/n/? shows all options] (y): y
Retrieving package sysstat-11.0.6-1.1.x86_64                                            (1/1), 268.8 KiB (  1.0 MiB unpacked)
Retrieving: sysstat-11.0.6-1.1.x86_64.rpm .............................................................................[done]
Checking for file conflicts: ..........................................................................................[done]
(1/1) Installing: sysstat-11.0.6-1.1.x86_64 ...........................................................................[done]
suse:~ #
suse:~ # systemctl status sysstat.service
sysstat.service - Write information about system start to sysstat log
Loaded: loaded (/usr/lib/systemd/system/sysstat.service; disabled)
Active: inactive (dead)

suse:~ # systemctl enable sysstat.service
ln -s '/usr/lib/systemd/system/sysstat.service' '/etc/systemd/system/default.target.wants/sysstat.service'
suse:~ # systemctl start sysstat.service
suse:~ #
suse:~ #
Zur Frage, was bei ‚top‘ die Anzahl der „running“ Tasks bedeuten:
https://linuxaria.com/howto/understanding-the-top-command-on-linux https://idea.popcount.org/2012-12-11-linux-process-states/
Einen eigenen Monitor bauen, der nur die „running/runsable“-Prozesse in der Warteschlange des Kernel-Schedulers zeigt:
$ watch -n1 -d "ps --sort=state -eo pid,state,comm | grep R"
Siehe auch Recherche mit den Google-Suchbegriffen „queueing runnable scheduler kernel“ (ohne Quoting) =>
http://www.informit.com/articles/article.aspx?p=101760&seqNum=2
Die Stresstests kann man mit Bordmitteln so ausführen:
$ tar -cjf usr.tar.bz /usr &
$ find / -type f -user root -exec grep -i linus {} \;
200.2 Predict Future Resource Needs
Auf SuSE Linux:
$ zypper install collectd
Weiter geht es so:
suse:~ # vi /etc/collectd.conf
Wir aktivieren die beiden folgenden Zeilen:
LoadPlugin swap
LoadPlugin users
Zur Kontrolle:
suse:~ # grep ^LoadPlug /etc/collectd.conf
LoadPlugin syslog
LoadPlugin cpu
LoadPlugin interface
LoadPlugin load
LoadPlugin memory
LoadPlugin rrdtool
LoadPlugin swap
LoadPlugin users
suse:~ #
Aktivieren und testen:
suse:~ # systemctl list-units --all | grep collect
collectd.service                                                                          loaded    active   running   System statistics collection daemon
systemd-readahead-collect.service                                                         loaded    inactive dead      Collect Read-Ahead Data
suse:~ #


suse:~ # systemctl status collectd.service
collectd.service - System statistics collection daemon
Loaded: loaded (/usr/lib/systemd/system/collectd.service; disabled)
Active: inactive (dead)

suse:~ #
suse:~ # systemctl enable collectd.service
ln -s '/usr/lib/systemd/system/collectd.service' '/etc/systemd/system/multi-user.target.wants/collectd.service'
suse:~ # systemctl start collectd.service
suse:~ #
suse:~ #
suse:~ # pgrep -a collect
6236 /usr/sbin/collectd -C /etc/collectd.conf -f
suse:~ #
Recherchetipp für Paketliste (google): „suse“ „collectd“ github.com/httpdss/collectd-web.git
Cacti unter SuSE
$ zypper in cacti
Dann lesen wir im Firefox die Dokumentation unter /usr/share/doc/packages/cacti/html.
Topic 201: Linux Kernel
201.1 Kernel Components
=> Siehe unter Überblick, Komponenten. (ausgelagert)
201.2 Compiling a kernel
=> Siehe unter Kernel kompilieren. (ausgelagert)
201.3 Kernel runtime management and troubleshooting
Im Unterschied zu LPI 101 gibt es diese neuen Begriffe:
lsdev (Informationen über vorhandene Hardware ausgeben, im Paket ‚procinfo‘ enthalten)
/etc/udev
udevmonitor
udevadm
Siehe auch:
Eine funktionierende Regeldatei für udev
ZIEL: Automatisches Auslösen von Backups beim Anstecken eines bestimmten, mit NTFS formatierten USB-SpeicherSticks.
Zuerst müssen wir die Seriennummer unseres USB-Hotplug-Geräts mit udevadm info -a -n /dev/sdb | grep serial | head -1 ermitteln.
Wir erzeugen dann eine Datei namens ‚/etc/udev/rules.d/88-mystick.rules‘ mit dem folgenden Inhalt:
### Bei Verwendung von NTFS taucht leider immer nur der Fehler "Der Socket ist nicht verbunden" beim Zugriff auf '/media/intenso' auf!
# Daher scheidet in diesem Falle natives Mounten aus.
#SUBSYSTEMS=="usb", KERNEL=="sd?1", ATTRS{serial}=="12082000208095", SYMLINK+="mystorage", RUN+="/usr/bin/logger --tag myusbbackup 'Backup via USB-Stick'", RUN+="/bin/mkdir /media/intenso", RUN+="/bin/mount -t ntfs-3g /dev/mystorage /media/intenso"

### Dann müssen wir eben auf bewährtes shell scripting zurückgreifen:
SUBSYSTEMS=="usb", KERNEL=="sd?1", ATTRS{serial}=="12082000208095", SYMLINK+="mystorage", RUN+="/usr/local/bin/mybackup"
Und hier ist das dazugehörige Skript:
#!/bin/bash
# /usr/local/bin/mybackup
HOME=/home/tux
mkdir -p $HOME/mounts
mount /dev/mystorage $HOME/mounts -o uid=tux,gid=tux,noatime
rsync -a --delete $HOME/Dokumente/ $HOME/mounts/Dokumente-tux/
umount $HOME/mounts
Aber nicht vergessen, das Skript mit chmod +x /usr/local/bin/mybackup ausführbar zu machen!
AUFGABE: Als Auslöser für die Backupaktion soll anstelle der Seriennummer die UUID herangezogen werden, siehe dazu http://superuser.com/questions/521402/use-uuid-in-udev-rules-and-mount-usb-drive-on-media-uuid
Eine mögliche Lösung in der Datei „/etc/udev/rules.de/99-intenso-stick.rules“:
SUBSYSTEMS=="usb", KERNEL=="sd?1", ENV{ID_FS_UUID}=="158DE60A6859CAA0", SYMLINK+="mystorage", \
        RUN+="/usr/local/bin/mybackup" \
        RUN+="/usr/bin/logger --tag myusbbackup "Device 158DE60A6859CAA0 eingebunden." \
        RUN+="/usr/bin/mkdir /media/158DE60A6859CAA0", \
        RUN+="/bin/mount /dev/mystorage /media/158DE60A6859CAA0"
Topic 202: System Startup
202.1 Customizing SysV-init system startup
Dazu bitte ein CentOS 6 bereitstellen…
[root@c6 ~]# ls -l /etc/init.d/
insgesamt 164
-rwxr-xr-x. 1 root root  3580 11. Mai 2016  auditd
-r-xr-xr-x. 1 root root  1343 11. Mai 2016  blk-availability
-rwxr-xr-x. 1 root root  2826 10. Nov 2015  crond
-rw-r--r--. 1 root root 25419 12. Apr 2016  functions
-rwxr-xr-x. 1 root root  5985 12. Apr 2016  halt
-rwxr-xr-x. 1 root root 11169 24. Jul 2015  ip6tables
-rwxr-xr-x. 1 root root 11048 24. Jul 2015  iptables
-rwxr-xr-x. 1 root root   652 12. Apr 2016  killall
-r-xr-xr-x. 1 root root  2137 11. Mai 2016  lvm2-lvmetad
-r-xr-xr-x. 1 root root  3045 11. Mai 2016  lvm2-monitor
-rwxr-xr-x. 1 root root  2571 11. Dez 2015  mdmonitor
-rwxr-xr-x. 1 root root  2523 11. Mai 2016  multipathd
-rwxr-xr-x. 1 root root  2989 12. Apr 2016  netconsole
-rwxr-xr-x. 1 root root  5309 12. Apr 2016  netfs
-rwxr-xr-x. 1 root root  6406 12. Apr 2016  network
-rwxr-xr-x. 1 root root  3912 10. Nov 2015  postfix
-rwxr-xr-x. 1 root root  1513 13. Nov 2015  rdisc
-rwxr-xr-x. 1 root root  1822 11. Mai 2016  restorecond
-rwxr-xr-x. 1 root root  2011 10. Dez 2014  rsyslog
-rwxr-xr-x. 1 root root  1698 11. Mai 2016  sandbox
-rwxr-xr-x. 1 root root  2056 27. Feb 2015  saslauthd
-rwxr-xr-x. 1 root root   647 12. Apr 2016  single
-rwxr-xr-x. 1 root root  4621 11. Mai 2016  sshd
-rwxr-xr-x. 1 root root  2294 11. Mai 2016  udev-post
[root@c6 ~]# head -15 /etc/init.d/sshd
#!/bin/bash
#
# sshd          Start up the OpenSSH server daemon
#
# chkconfig: 2345 55 25
# description: SSH is a protocol for secure remote shell access. \
#              This service starts up the OpenSSH server daemon.
#
# processname: sshd
# config: /etc/ssh/ssh_host_key
# config: /etc/ssh/ssh_host_key.pub
# config: /etc/ssh/ssh_random_seed
# config: /etc/ssh/sshd_config
# pidfile: /var/run/sshd.pid

[root@c6 ~]#
[root@c6 ~]#
[root@c6 ~]# less /etc/init.d/sshd
[root@c6 ~]#
[root@c6 ~]#
[root@c6 ~]# ls -l /etc/rc3.d/
insgesamt 0
lrwxrwxrwx. 1 root root 19 17. Jan 08:48 K10saslauthd -> ../init.d/saslauthd
lrwxrwxrwx. 1 root root 20 17. Jan 08:49 K87multipathd -> ../init.d/multipathd
lrwxrwxrwx. 1 root root 21 17. Jan 08:48 K87restorecond -> ../init.d/restorecond
lrwxrwxrwx. 1 root root 20 17. Jan 08:48 K89netconsole -> ../init.d/netconsole
lrwxrwxrwx. 1 root root 15 17. Jan 08:48 K89rdisc -> ../init.d/rdisc
lrwxrwxrwx. 1 root root 22 17. Jan 08:49 S02lvm2-monitor -> ../init.d/lvm2-monitor
lrwxrwxrwx. 1 root root 19 17. Jan 08:48 S08ip6tables -> ../init.d/ip6tables
lrwxrwxrwx. 1 root root 18 17. Jan 08:48 S08iptables -> ../init.d/iptables
lrwxrwxrwx. 1 root root 17 17. Jan 08:48 S10network -> ../init.d/network
lrwxrwxrwx. 1 root root 16 17. Jan 08:49 S11auditd -> ../init.d/auditd
lrwxrwxrwx. 1 root root 17 17. Jan 08:48 S12rsyslog -> ../init.d/rsyslog
lrwxrwxrwx. 1 root root 19 17. Jan 08:49 S15mdmonitor -> ../init.d/mdmonitor
lrwxrwxrwx. 1 root root 26 17. Jan 08:49 S25blk-availability -> ../init.d/blk-availability
lrwxrwxrwx. 1 root root 15 17. Jan 08:48 S25netfs -> ../init.d/netfs
lrwxrwxrwx. 1 root root 19 17. Jan 08:48 S26udev-post -> ../init.d/udev-post
lrwxrwxrwx. 1 root root 14 17. Jan 08:49 S55sshd -> ../init.d/sshd
lrwxrwxrwx. 1 root root 17 17. Jan 08:48 S80postfix -> ../init.d/postfix
lrwxrwxrwx. 1 root root 15 17. Jan 08:48 S90crond -> ../init.d/crond
lrwxrwxrwx. 1 root root 11 17. Jan 08:48 S99local -> ../rc.local
[root@c6 ~]#
[root@c6 ~]#
[root@c6 ~]# find /etc/rc* /etc/init.d/ -name "*cron*"
/etc/rc.d/rc2.d/S90crond
/etc/rc.d/init.d/crond
/etc/rc.d/rc0.d/K60crond
/etc/rc.d/rc6.d/K60crond
/etc/rc.d/rc1.d/K60crond
/etc/rc.d/rc5.d/S90crond
/etc/rc.d/rc4.d/S90crond
/etc/rc.d/rc3.d/S90crond
/etc/init.d/crond
[root@c6 ~]#
[root@c6 ~]#
[root@c6 ~]# ls -ld /etc/rc.d/init.d
drwxr-xr-x. 2 root root 4096 17. Jan 08:49 /etc/rc.d/init.d
[root@c6 ~]#
[root@c6 ~]# ls -ld /etc/init.d
lrwxrwxrwx. 1 root root 11 17. Jan 08:48 /etc/init.d -> rc.d/init.d
[root@c6 ~]#
[root@c6 ~]#
[root@c6 ~]# chkconfig --help
chkconfig Version 1.3.49.5 - Copyright (C) 1997-2008 Red Hat, Inc.
Kostenlose Weitergabe unter den Bedingungen der GNU Public License erlaubt.

Verwendung:   chkconfig [--list] [--type <type>] [name]
        chkconfig --add <Name>
        chkconfig --del <Name>
        chkconfig --override <Name>
        chkconfig [--level <levels>] [--type <type>] <Name> <on|off|reset|resetpriorities>
[root@c6 ~]#


[root@c6 ~]# chkconfig --del crond
[root@c6 ~]#
[root@c6 ~]# find /etc/rc* /etc/init.d/ -name "*cron*" -type l
[root@c6 ~]#
[root@c6 ~]# chkconfig --add crond
[root@c6 ~]#
[root@c6 ~]# find /etc/rc* /etc/init.d/ -name "*cron*" -type l
/etc/rc.d/rc2.d/S90crond
/etc/rc.d/rc0.d/K60crond
/etc/rc.d/rc6.d/K60crond
/etc/rc.d/rc1.d/K60crond
/etc/rc.d/rc5.d/S90crond
/etc/rc.d/rc4.d/S90crond
/etc/rc.d/rc3.d/S90crond
[root@c6 ~]#
[root@c6 ~]#
[root@c6 ~]# chkconfig --level 0123456 crond off
[root@c6 ~]#
[root@c6 ~]# find /etc/rc* /etc/init.d/ -name "*cron*" -type l
/etc/rc.d/rc2.d/K60crond
/etc/rc.d/rc0.d/K60crond
/etc/rc.d/rc6.d/K60crond
/etc/rc.d/rc1.d/K60crond
/etc/rc.d/rc5.d/K60crond
/etc/rc.d/rc4.d/K60crond
/etc/rc.d/rc3.d/K60crond
[root@c6 ~]#
[root@c6 ~]# chkconfig --level 0123456 crond on
[root@c6 ~]# find /etc/rc* /etc/init.d/ -name "*cron*" -type l
/etc/rc.d/rc2.d/S90crond
/etc/rc.d/rc0.d/S90crond
/etc/rc.d/rc6.d/S90crond
/etc/rc.d/rc1.d/S90crond
/etc/rc.d/rc5.d/S90crond
/etc/rc.d/rc4.d/S90crond
/etc/rc.d/rc3.d/S90crond
[root@c6 ~]#
[root@c6 ~]#
[root@c6 ~]#
[root@c6 ~]# chkconfig --del crond
[root@c6 ~]#
[root@c6 ~]# find /etc/rc* /etc/init.d/ -name "*cron*" -type l
[root@c6 ~]#
[root@c6 ~]# chkconfig --add crond
[root@c6 ~]#
[root@c6 ~]# find /etc/rc* /etc/init.d/ -name "*cron*" -type l
/etc/rc.d/rc2.d/S90crond
/etc/rc.d/rc0.d/K60crond
/etc/rc.d/rc6.d/K60crond
/etc/rc.d/rc1.d/K60crond
/etc/rc.d/rc5.d/S90crond
/etc/rc.d/rc4.d/S90crond
/etc/rc.d/rc3.d/S90crond
Nach dem Bereitstellen eines hier nur simulierten, neuen Skripts:
[root@c6 ~]# chkconfig --level 3 netcontrol on
Fehler beim Lesen der Informationen über den Dienst netcontrol: Datei oder Verzeichnis nicht gefunden
[root@c6 ~]#
[root@c6 ~]#
[root@c6 ~]# cp /etc/init.d/network /etc/init.d/netcontrol    # Simulation
[root@c6 ~]#
[root@c6 ~]# chkconfig --level 3 netcontrol on
[root@c6 ~]#
[root@c6 ~]# find /etc/rc* /etc/init.d/ -name "*control*" -type l
/etc/rc.d/rc2.d/S10netcontrol
/etc/rc.d/rc0.d/K90netcontrol
/etc/rc.d/rc6.d/K90netcontrol
/etc/rc.d/rc1.d/K90netcontrol
/etc/rc.d/rc5.d/S10netcontrol
/etc/rc.d/rc4.d/S10netcontrol
/etc/rc.d/rc3.d/S10netcontrol
[root@c6 ~]#
Unter Debian:
root@deb8:~# find /etc/ -type l -name "*cron"
/etc/rc4.d/S03cron
/etc/rc5.d/S03cron
/etc/rc3.d/S03cron
/etc/rc2.d/S03cron
root@deb8:~#
root@deb8:~# update-rc.d  -f  cron  remove
root@deb8:~#
root@deb8:~# find /etc/ -type l -name "*cron"
root@deb8:~#
root@deb8:~# update-rc.d cron defaults
root@deb8:~# find /etc/ -type l -name "*cron"
/etc/rc4.d/S03cron
/etc/rc5.d/S03cron
/etc/rc3.d/S03cron
/etc/rc2.d/S03cron
root@deb8:~#
Unter Suse würde das so gehen (Debian lenkt ‚update-rc.d‘ jetzt auf ‚innserv‘ um):
root@deb8:~# insserv -r cron
root@deb8:~#
root@deb8:~# find /etc/ -type l -name "*cron"
root@deb8:~#
root@deb8:~# insserv  cron
root@deb8:~#
root@deb8:~# find /etc/ -type l -name "*cron"
/etc/rc4.d/S03cron
/etc/rc5.d/S03cron
/etc/rc3.d/S03cron
/etc/rc2.d/S03cron
root@deb8:~#
202.2 System Recovery
Fehlersuche MBR mit GRUB 2
Ausgangspunkt:
root@deb8:~# cat /proc/cmdline
BOOT_IMAGE=/vmlinuz-3.16.0-4-amd64 root=/dev/mapper/deb8--vg-root ro quiet
root@deb8:~#
root@deb8:~#
root@deb8:~#
root@deb8:~# lsblk
NAME                MAJ:MIN RM  SIZE RO TYPE  MOUNTPOINT
sda                   8:0    0   50G  0 disk
├─sda1                8:1    0  243M  0 part  /boot
├─sda2                8:2    0    1K  0 part
└─sda5                8:5    0 49,8G  0 part
├─deb8--vg-root   253:0    0  8,4G  0 lvm   /
├─deb8--vg-swap_1 253:1    0 1020M  0 lvm   [SWAP]
├─deb8--vg-var    253:2    0  2,8G  0 lvm   /var
├─deb8--vg-tmp    253:3    0  380M  0 lvm   /tmp
└─deb8--vg-home   253:4    0 37,2G  0 lvm   /home
sdb                   8:16   0    2G  0 disk
└─md0                 9:0    0    2G  0 raid1
├─my--data-doc    253:5    0  500M  0 lvm
└─my--data-bilder 253:6    0  700M  0 lvm
sdc                   8:32   0    2G  0 disk
└─md0                 9:0    0    2G  0 raid1 1
├─my--data-doc    253:5    0  500M  0 lvm
└─my--data-bilder 253:6    0  700M  0 lvm
sr0                  11:0    1 56,6M  0 rom
root@deb8:~#
Nun simulieren wir einen Fehler beim Ausführen von Grub2 in der zweiten Stufe:
$ mv /boot/grub/grub.cfg /boot/grub/grub.cfg_OK
$ reboot
Jetzt fährt das System in den Bootprompt von Grub2 hinein, weil die Konfigurationsdatei nicht mehr gefunden wird.
Dort schreiben wir:
Minimal BASH-like line editing is supported. For the first word,
TAB lists possible command completions. Anywhere else TAB lists
possible device or file completions.
grub>
grub> set root="hd0,1"
grub> linux /vmlinuz-3.16.0-4-amd64 root=/dev/mapper/deb8--vg-root ro
grub> initrd /initrd.img-3.16.0-4-amd64
grub> boot
Nach dem Bootvorgang:
root@deb8:~# cat /proc/cmdline
BOOT_IMAGE=/vmlinuz-3.16.0-4-amd64 root=/dev/mapper/deb8--vg-root ro
root@deb8:~#
root@deb8:~# grub
-su: grub: Kommando nicht gefunden.
root@deb8:~#
root@deb8:~#
root@deb8:~# mv /boot/grub/grub.cfg_OK /boot/grub/grub.cfg
Simulation eines MBR-Problems (Bootcode + Partitionstablle defekt):
root@deb8:~# dd if=/dev/zero of=/dev/sda bs=512 count=1
1+0 Datensätze ein
1+0 Datensätze aus
512 Bytes (512 B) kopiert, 0,00127903 s, 400 kB/s
root@deb8:~# reboot
Wir haben nun diese Fehlermeldung: „FATAL: No bootable Medium found“!!
Das System wird jetzt mit einer Rettungs-CD (modifiziertes DebianDog, SystemRescueCD)
Im Terminal als root:
$ lsblk   ### (Nur das Major-Device /dev/sda ist zu sehen!)

$ testdisk

> [create]
> Disk /dev/sda - 53 GB  ### ausgewählt
> [proceed]
> [Intel] ...
> [Analyse]
> [Quick Search]      ### Zwei grün markierte PArtitionen wurden gefunden, damit ist alles OK
> "Enter to continue"
> Cusor nach Rechts: [Write]    ### Die beiden Parts werden noch einmal gezeigt)
> Confirm: "Y"
> [OK] ... [Ωuit] ... [Quit]
Das Kommando lsblk zeigt dann auch schon die Gerätedateien, partprobe ist unnötig, ein Reboot ganz und gar.
Mittels SystemRescueCD:
grub2-install --no-floppy --root-directory=/mnt/custom /dev/sda
Wir können anstelle dessen die Simulation aus so durchführen:
$ cat /boot/grub/i386-pc/boot.img > /dev/sda     # MBR mit First-Stage Bootcode überschreiben
$ apt-get install testdisk
$ testdisk
EFI-System mit GRUB 2 für Dual-Boot
Nach dem Platzschaffen für Linux mit Hilfe der Datenträgerverwaltung von Windows 10 sieht das Ganze bei gdisk -l folgendermaßen aus:
GPT fdisk (gdisk) version 1.0.3

Partition table scan:
MBR: protective
BSD: not present
APM: not present
GPT: present

Found valid GPT with protective MBR; using GPT.
Disk /dev/sda: 500118192 sectors, 238.5 GiB
Model: Micron MTFDDAK25
Sector size (logical/physical): 512/512 bytes
Disk identifier (GUID): 85123B07-ABED-85E4-B6AA-D3CF6333928E
Partition table holds up to 128 entries
Main partition table begins at sector 2 and ends at sector 33
First usable sector is 34, last usable sector is 500118158
Partitions will be aligned on 2048-sector boundaries
Total free space is 4717 sectors (2.3 MiB)

Number  Start (sector)    End (sector)  Size       Code  Name
1            2048          534527   260.0 MiB   EF00  EFI system partition
2          534528          567295   16.0 MiB    0C01  Microsoft reserved ...
3          567296       395669503   188.4 GiB   0700  Basic data partition
4       395669504       498067455   48.8 GiB    0700  rootfs
5       498069504       500117503   1000.0 MiB  2700  Basic data partition
202.3 Alternate Bootloaders
Bootloader LILO
Der althergebrachte Bootloader hat mit folgenden Schönheitsfehlern zu kämpfen:
Da seine Konfigurationsdatei unter /etc liegt (also auf dem RootFS!) und nicht unter /boot (was auslagerbar wäre), sollte das gesamte Linux-OS aus historischen Gründen unterhalb der 1024-Zylindergrenze der Festplatte liegen.
Außerdem ist er nur einstufig aufgebaut, so dass nach Änderungen der
/etc/lilo.confder MBR mittels des System Binariesliloneu zu erzeugen ist!
Hier nun eine exemplarische Installation und Konfigration von LILO:
$ apt-get install lilo
Dabei infomiert und der Assistent, dass unbedingt ‚liloconfig‘ und ‚/sbin/lilo‘ auszuführen sind.
root@deb8:~# cat /etc/lilo.conf
cat: /etc/lilo.conf: Datei oder Verzeichnis nicht gefunden
root@deb8:~#
root@deb8:~#
root@deb8:~# liloconfig
2 images '/boot/vmlinuz*' found.
New file created as: /etc/lilo.conf
Now you must execute '/sbin/lilo' to activate this new configuation!

root@deb8:~# cat /etc/lilo.conf
# /etc/lilo.conf  -   systemwide LILO configuration (LILO 23)
# details see in manpages: lilo(8) and lilo.conf(5)

# +-------------------------------------------------------------+
# |                        !! Reminder !!                       |
# |                                                             |
# | Don't forget to run 'lilo' after you make changes to this   |
# | conffile or you have installed a new kernel.                |
# +-------------------------------------------------------------+


# #################### LILO global section ######################

# With all newer systems (until year 2004) you can use the RAM
# above 15 MB. This option allows the use of this range of RAM.
#large-memory

# With all newer systems you can boot from any partition on disks
# with more than 1024 cylinders. This option allows the use of
# partitions above 1024 cylinders.
lba32

# Defines the boot device.  This is where Lilo installs its boot
# block.  It can be either a partition, or the raw device, in which
# case it installs in the MBR, and will overwrite the current MBR.
# With newer kernel you should use the ID of the boot device, which
# can be found here: /dev/disks/by-id/ata*.
#boot = /dev/mapper/deb8--vg-root
boot = /dev/disk/by-id/

# Defines the partition which is the root partition. This partition
# will be mounted at first from the kernel. With newer kernel you
# should use the UUID (UUID="...") of the root device, which can be
# found here: /dev/disks/by-uuid/*.
root = /dev/mapper/deb8--vg-root

# This option may be needed for some software RAID installs.
#raid-extra-boot = mbr-only

# Enable map compaction.  This tries to merge read requests for
# adjacent sectors into a single read request. This drastically
# reduces load time and keeps the map smaller.  Using 'compact'
# is especially recommended when booting from a floppy disk.
# It is disabled here by default because it doesn't always work.
#compact

# Set the verbose level for bootloader installation. Value range:
# 0 to 5. Default value is 0.
#verbose = 1

# Specifies the location of the map file. Lilo creates the (sector)
# map file of direct sector addresses which are independent of any
# filesystem.
map = /boot/map

# ---------------------------------------------------------------

# Specifies the menu interface. You have the choice between:
#   text: simple text menu with black background and white text
#   menu: configurable text menu with background and text colors.
#   bmp:  graphical menu with 640x480 bitmap background.
install = menu

# A) Customized boot message for choice 'text'.
# For the simple text menu you can set an extra message in the
# created file. Its text will be displayed before boot prompt.
#message = /boot/message.txt

# B) Configuration of the scheme for choice 'menu'.
# Use following coding: <text>:<highlight>:<border>:<title>
# The first character of each part sets the text frontcolor,
# the second character of earch part sets the text backcolor,
# an upper-case character sets bold face text (frontcolor).
# i.g. 'menu-scheme=wm:rw:wm:Wm'. Possible colors:
# k=black, b=blue, g=green, c=cyan, r=red, m=magenta, y=yellow, w=white.
menu-scheme = Wb:Yr:Wb:Wb
#menu-title = " DESDEMONA Boot-Manager "

# C) Configuration of the image for choice 'bmp'.
# For the graphical menu you need a bitmap file, which needs a special
# menu configuration in the file header (see: lilo -E). Ideally you
# use one of the delivered images of the lilo package.
#   with 16 colors:    onlyblue, tuxlogo, inside
#   with 256 colors:   coffee
#   for Debian:        debianlilo, debian, debian-de
#bitmap = /boot/tuxlogo.bmp

# ---------------------------------------------------------------

# Specifies the number of deciseconds (0.1 seconds) how long LILO
# should wait before booting the first image.  LILO doesn't wait if
# 'delay' is omitted or set to zero. You do not see the defined menu.
#delay = 20

# Prompt to start one certain kernel from the displayed menu.
# It is very recommeded to also set 'timeout'. Without timeout boot
# will not take place unless you hit return. Timeout is the number
# of deciseconds (0.1 seconds) after there the default image will
# be started. With 'single-key' alias numbers for each menu line can
# be used.
prompt
timeout = 100
#single-key

# ---------------------------------------------------------------

# Specifying the VGA text mode that should be selected when booting.
# The following values are recognized (case is ignored):
#   vga=normal    80x25 text mode (default)
#   vga=extended  80x50 text mode (abbreviated to 'ext')
#   vga=ask       stop and ask for user input: choice of text mode
#   vga=<mode>    use the corresponding text mode number. A list of
#                   available modes can be obtained by booting with
#                   vga=ask'  and then pressing [Enter].
# Another way is the use of frame buffer mode. Then the kernel
# will switch from the normal vga text mode (80x25) to the frame
# buffer mode (if frame buffer support is in the kernel):
#   vga=0x314      800x600 @ 16 bit
#   vga=0x317     1024x768 @ 16 bit
#   vga=0x318     1024x768 @ 24 bit
#vga = ask
vga = normal
#vga = 0x317

# ---------------------------------------------------------------

# Kernel command line options that apply to all installed images go
# here.  See 'kernel-parameters.txt' in the Linux kernel 'Documentation'
# directory. I.g. for start into 'init 5' write:  append="5"
#append = ""

# If you used a serial console to install Debian, this option should be
# enabled by default.
#serial = 0,9600

# Set the image which should be started after delay or timeout.
# If not set, the first defined image will be started.
#default = Linux


# ################### LILO per-image section ####################

# Each image is configured with the linux kernel (=image) and
# usually with the initrd file. Configure all GNU/Linux systems
# on other partitions, too.

image = /boot/vmlinuz-3.14.51-grsec
    label = "Linux"
    read-only
#   restricted
#   alias = 1
#   optional
    initrd = /boot/initrd.img-3.14.51-grsec

image = /boot/vmlinuz-3.16.0-4-amd64
    label = "Linux Old"
    read-only
#   restricted
#   alias = 2
#   optional
    initrd = /boot/initrd.img-3.16.0-4-amd64

root@deb8:~#
Für einen besseren Überblick:
root@deb8:~# cat /etc/lilo.conf  | grep -v ^# | grep -v ^$
lba32
boot = /dev/disk/by-id/
root = /dev/mapper/deb8--vg-root
map = /boot/map
install = menu
menu-scheme = Wb:Yr:Wb:Wb
prompt
timeout = 100
vga = normal

image = /boot/vmlinuz-3.14.51-grsec
    label = "Linux"
    read-only
    initrd = /boot/initrd.img-3.14.51-grsec
image = /boot/vmlinuz-3.16.0-4-amd64
    label = "Linux Old"
    read-only
    initrd = /boot/initrd.img-3.16.0-4-amd64
tux@deb8:~$
Beim Testen der Konfiguration tritt ein Fehler auf:
root@deb8:~# lilo -t
Fatal: open /dev/disk/by-id/: Is a directory
root@deb8:~#
Wir müssen die Konfigurationsdatei ‚lilo.conf‘ ändern:
boot = /dev/sda
Danach muss der MBR neu geschrieben werden:
root@deb8:~# lilo -t
Added Linux  +  *
Added Linux_Old  +
The boot sector and the map file have *NOT* been altered.
root@deb8:~#
root@deb8:~# lilo
Added Linux  +  *
Added Linux_Old  +
root@deb8:~#
Siehe dazu auch http://www.pro-linux.de/artikel/2/863/konfiguration-von-lilo.html
SYSLINUX-Projekt
Zu der Bootloaderfamilie gehören insbeondere:
Syslinux: Boot-Loader für DOS, FAT und NTFS (von Windows-Dateisystemen aus starten)
Isolinux: Boot-Loader für optische Datenträger (CD/DVD) mit ISO-9660, siehe auch https://de.wikipedia.org/wiki/El_Torito
Wer sich mit Isolinux und dem Bootfähigmachen eines ISOs beschäftigen möchte: => https://openwritings.net/pg/debiandog/create-custom-debiandog-iso
DebianDog ist ein interessantes Puppy-Derivat auf Basis von Debian: https://debiandog.github.io/doglinux/
Zum Sonderformat „Isohybrid“: Mit ein und dem selben ISO-File kann:
Ein optischer Datenträger beschrieben werden
Eine Festplatte als Kopierziel benutzt werden (usb-storage, USB-Sticks, SSD, NVMe)
So liegen viele Linux-Bootmedian in diesem Format vor, => https://www.debian.org/CD/live/ („Hybrid“ ISO image files suitable for writing to DVD-R(W) media, and also USB keys of the appropriate size“)
Im Praxisfall von Linux Mint:
wget -c http://mirror.netcologne.de/linuxmint/iso/stable/20/linuxmint-20-cinnamon-64bit.iso

# Zu a)  growisofs -dvd-compat -Z /dev/sr0=linuxmint-20-cinnamon-64bit.iso
# Zu b)  dd if=linuxmint-20-cinnamon-64bit.iso of=/dev/<MYSTICK> bs=4M
Extlinux: Boot-Loader für XFS, btrfs, ext2, ext3 und ext4 (Linux-Systeme booten)
Siehe dazu auch https://linux-club.de/wiki/opensuse/Installationsbootloader
Einrichtung von extlinux
Siehe dazu das ausgelagerte Dokument unter Bootvorgang mit extlinux.
Einrichtung von PXE-Boot
PXE (Pre Execution Environment) ist ein Ersatz für die Boot-ROMs der alten Netzwerkkarten. Siehe dazu das ausgelagerte Dokument unter Bootserver mit PXE.
Shim-Bootloader
Motivation: Es soll das Hacking der Windows-Accountdatenbankdatei „SAM“ und anderer böser Angriffe erschwert werden (Übrigens: Linux kann mit Hilfe von ‚chntpw‘ vergessene Windows-Passwörter überschreiben).
Hier ein kleiner Ausflug in die EFI-Welt mit Secure-Boot:
root@d10efi:~ # df -h /boot/efi/
Dateisystem    Größe Benutzt Verf. Verw% Eingehängt auf
/dev/sda1       511M    5,2M  506M    2% /boot/efi
root@d10efi:~ #
root@d10efi:~ # findmnt /boot/efi/
TARGET    SOURCE    FSTYPE OPTIONS
/boot/efi /dev/sda1 vfat   rw,relatime,fmask=0077,dmask=0077,codepage=437,iocharset=ascii,shortname=mixed,utf8,errors=remount-ro
root@d10efi:~ #
root@d10efi:~ # ls -l /boot/efi/EFI/debian/
insgesamt 5228
-rwx------ 1 root root     108 Mär  9 08:47 BOOTX64.CSV
-rwx------ 1 root root 1206824 Mär  9 08:47 fbx64.efi
-rwx------ 1 root root     121 Mär  9 08:47 grub.cfg
-rwx------ 1 root root 1549696 Mär  9 08:47 grubx64.efi
-rwx------ 1 root root 1261192 Mär  9 08:47 mmx64.efi
-rwx------ 1 root root 1322936 Mär  9 08:47 shimx64.efi
root@d10efi:~ #
root@d10efi:~ # cd /boot/efi/EFI/debian/
root@d10efi:/boot/efi/EFI/debian #
root@d10efi:/boot/efi/EFI/debian # ## Dies ist NICHT das signierte Bootloaderprogramm:
root@d10efi:/boot/efi/EFI/debian# file grubx64.efi
grubx64.efi: PE32+ executable (EFI application) x86-64 (stripped to external PDB), for MS Windows
root@d10efi:/boot/efi/EFI/debian #
root@d10efi:/boot/efi/EFI/debian #
root@d10efi:/boot/efi/EFI/debian # ## Aber dies ist das signierte Bootloaderprogramm für Secure-Boot:
root@d10efi:/boot/efi/EFI/debian # file shimx64.efi
shimx64.efi: PE32+ executable (EFI application) x86-64 (stripped to external PDB), for MS Windows
root@d10efi:/boot/efi/EFI/debian #
root@d10efi:/boot/efi/EFI/debian #
root@d10efi:/boot/efi/EFI/debian # ## Nach der Installation mittels `apt-get install binutils`:
root@d10efi:/boot/efi/EFI/debian # strings shimx64.efi | grep -i 509 | head -3
X509
X509v3 Subject Key Identifier
X509v3 Key Usage
root@d10efi:/boot/efi/EFI/debian #
root@d10efi:/boot/efi/EFI/debian # strings grubx64.efi | grep -i 509 | head
root@d10efi:/boot/efi/EFI/debian # ##   >> bei letzterem fehlt die Einbindung von X.509-Zertifikaten!
Siehe auch:
Weitere Bootloader
Im Embedded-Bereich: „uboot“ (Cubieboard) oder „µboot“
Bei Linux-Systemen mit Systemd: „systemd-boot“ (kann lediglich EFI-Images aus der ESP heraus booten)
Topic 203: Filesystem and Devices
203.1 Operating the Linux filesystem
=> Siehe auch die Studyguides zu LPIC-1
Wichtige Begriffe:
/etc/fstab
/etc/mtab
/proc/mounts
mount and umount
blkid
sync
swapon
swapoff
Tools für kleine Übungsszenarien
dd, truncate, fallocate und losetup
Falls gerade mal wieder keine 2. Festplatte oder auch kein geeigneter USB-Stick zu Hand ist und fernerhin auch nicht die Swap-Partition für Experimente missbraucht werden kann, bieten sich normale Dateien an, die einfach formatiert werden können. Allerdings kann sie der Kernel nicht direkt mounten, wir müssen der regulären Datei mit Hilfe des loop-Treibers ein Blockgerät zur Seite stellen, was wir später mit losetup erledigen werden.
Zuerst einmal brauchen wir die „Festplatten“. Hier ein paar Beispiele, die allesamt 512 MB große Dateien erzeugen können:
Platz komplett belegen:
dd if=/dev/zero of=/tmp/hdd01.img bs=1M count=512Platz nicht belegen (Sparse file):
dd if=/dev/zero of=/tmp/hdd02.img count=0 bs=1 seek=512MPlatz nicht belegen (Sparse file):
truncate -s 512M /tmp/hdd03.imgPlatz zuweisen, aber als nicht geschrieben markieren:
fallocate -l 512M /tmp/hdd04.img
HINWEIS: Für das Erzeugen von Swapspace-Dateien sind Sparse-files [wikip] allerdings nicht geeignet, weil sie mit einem „Loch“ enden.
parted, gparted, fdisk, gdisk, cfdisk
Ein praktisches Werkzeug, um auf schnelle und intelligente Art Partitionen zu erzeugen, ist parted, hier ein paar mögliche Aufrufe:
# Kontrolle der Partitionierung:
parted -s <DEVICE> print free

# MBR- oder GPT-Partitionstabelle erzeugen:
parted -s <DEVICE> mklabel msdos
parted -s <DEVICE> mklabel gpt

# MBR-Partitionstabelle erzeugen sowie eine primäre Partition von 8 MB bis Maximalgröße:
parted -s <DEVICE> mklabel msdos mkpart primary 8 100%

# MBR-Partitionstab. erzeugen sowie eine primäre Partition für Swap-Nutzung von 8 MB bis 3 GB:
parted -s <DEVICE> mklabel msdos mkpart primary linux-swap 8 3G
# Eine zweite, primäre Partition von 3GB bis Maximalgröße erzeugen:
parted -s <DEVICE> mkpart primary 3G 100%

# Bootflag auf Partition 1 deaktivieren:
parted -s <DEVICE> set 1 boot off
# Bootflag auf Partition 3 aktivieren:
parted -s <DEVICE> set 3 boot on

# Eine primäre Partition von 8 MB bis 10% der Maximalgröße erzeugen:
parted -s <DEVICE> mkpart primary 8 10%
# Eine sich anschließende Partition von 10% bis 30% der Maximalgröße erzeugen:
parted -s <DEVICE> mkpart primary 10% 30%

# Eine erweiterte Partition bis Maximalgröße erstellen:
parted -s test mkpart extended 40% 100%
# Erste logische Partition erstellen (z.B. /dev/sda5):
parted -s <DEVICE> mkpart logical 40% 60%
# Zweite logische Partition erstellen (z.B. /dev/sda6), speziell für ext4:
parted -s <DEVICE> mkpart logical ext4 60% 100%

# Partition Nr. 6 löschen (= die zweite logische Partition):
parted -s <DEVICE> rm 6

# Ein neues Disklabel schreiben (komplett neues Partitionsschema erzeugen!!),
# danach zwei Partitionen mit Bezeichnern anlegen (mit Bezeichnern geht nur bei GPT):
parted -s <DEVICE> mklabel gpt
parted -s <DEVICE> mkpart MyRootFs ext4 8 90%
parted -s <DEVICE> mkpart MySwapSpace linux-swap 90% 100%

# Partitionstyp für Partition 1 setzen (die Auflösung von "lvm" zur ID 0x8e erfolgt automatisch):
parted -s <DEVICE> set 1 lvm on
Dazu ein paar praktische Beispiele. Zuerst partitionieren wir unsere oben unter b) erzeugte Image-Datei /tmp/hdd02.img:
root@host~ # parted -s /tmp/hdd02.img mklabel msdos mkpart primary fat32 8 200M
root@host~ #
root@host~ # parted -s /tmp/hdd02.img print
Modell:  (file)
Festplatte  /tmp/hdd02.img:  537MB
Sektorgröße (logisch/physisch): 512B/512B
Partitionstabelle: msdos
Disk-Flags:

Nummer  Anfang  Ende   Größe  Typ      Dateisystem  Flags
1      8389kB  200MB  192MB  primary               lba

root@host~ #
Dann suchen wir nach Partitionen in dieser Image-Datei und lassen uns die entsprechenden Blockgeräte (= „loops“) erzeugen:
root@host~ # ## Alle loops auflisten:
root@host~ # losetup -al
root@host~ #
root@host~ # ## Alle evl. bestehenden loops freigeben (detach):
root@host~ # losetup -D
root@host~ #
root@host~ # ## In der angegebenen Datei automatisch nach Partitionen suchen
root@host~ # ## und die jew. Blockgeräte erzeugen (leider gibt das Tool nur das
root@host~ # ## Major-Device zurück und nicht die Minor-Devices, also die Partitionen):
root@host~ # losetup -fP --show /tmp/hdd02.img
/dev/loop0
root@host~ #
root@host~ # ## Um die Partitionen zu ermitteln, eben dieses Device hernehmen, aber mit Joker:
root@host~ # ls -l /dev/loop0*
brw-rw---- 1 root disk   7, 0 11. Mär 16:37 /dev/loop0
brw-rw---- 1 root disk 259, 0 11. Mär 16:37 /dev/loop0p1
root@host~ #
root@host~ # ##     >> Nun sehen wir, welche Partitionen existieren ("loop0p1")
root@host~ #
root@host~ # losetup -al
NAME       SIZELIMIT OFFSET AUTOCLEAR RO BACK-FILE           DIO LOG-SEC
/dev/loop0         0      0         0  0 /tmp/hdd02.img   0     512
root@host~ #
root@host~ # ##     >> Hierbei sind sie leider nicht zu sehen! ('kpartx' kann da deutlich mehr!)
Mit mkfs.vfat -F32 /dev/loop0p1 kann nun - wie oben vordefiniert - ein FAT-Dateisystemen auf das Device aufgebracht werden.
203.2 Maintaining a Linux filesystem
Um den ‚smartd‘ zum Laufen zu bringen, müssten wir hier etwas tun:
root@deb8:~# cat /etc/default/smartmontools
# Defaults for smartmontools initscript (/etc/init.d/smartmontools)
# This is a POSIX shell fragment

# List of devices you want to explicitly enable S.M.A.R.T. for
# Not needed (and not recommended) if the device is monitored by smartd
#enable_smart="/dev/hda /dev/hdb"

# uncomment to start smartd on system startup
#start_smartd=yes

# uncomment to pass additional options to smartd on startup
#smartd_opts="--interval=1800"
root@deb8:~#

root@deb8:~# smartctl -a /dev/sda
smartctl 6.4 2014-10-07 r4002 [x86_64-linux-3.14.51-net-fs-grsec] (local build)
Copyright (C) 2002-14, Bruce Allen, Christian Franke, www.smartmontools.org

=== START OF INFORMATION SECTION ===
Device Model:     VBOX HARDDISK
Serial Number:    VB23b08c69-abf43a85
Firmware Version: 1.0
User Capacity:    53.687.091.200 bytes [53,6 GB]
Sector Size:      512 bytes logical/physical
Device is:        Not in smartctl database [for details use: -P showall]
ATA Version is:   ATA/ATAPI-6 published, ANSI INCITS 361-2002
Local Time is:    Fri Jan 20 11:42:44 2017 CET
SMART support is: Unavailable - device lacks SMART capability.

A mandatory SMART command failed: exiting. To continue, add one or more '-T permissive' options.
root@deb8:~#
Das XFS-Dateisystem
Voraussetzungen:
Installation des Debian-Pakets xfsprogs
- Erstellung eines Übungs-Festplattenimages:
root@deb7:~# dd if=/dev/zero of=hdd01.img bs=1M count=500
Zuerst einmal wird ein xfs-Dateisystem erzeugt:
root@deb7:~# mkfs -t xfs hdd01.img
meta-data=hdd01.img              isize=256    agcount=4, agsize=32000 blks
         =                       sectsz=512   attr=2, projid32bit=0
data     =                       bsize=4096   blocks=128000, imaxpct=25
         =                       sunit=0      swidth=0 blks
naming   =version 2              bsize=4096   ascii-ci=0
log      =Internes Protokoll     bsize=4096   blocks=1200, version=2
         =                       sectsz=512   sunit=0 blks, lazy-count=1
realtime =keine                  extsz=4096   blocks=0, rtextents=0
Diskquotas einrichten:
Die Einrichtung ist schnell gemacht: Die neu formatierte Partition muss für Userquotas einfach nur mit der Option uquota gemountet werden:
root@deb7:~# mount -o uquota hdd01.img /mnt
Zur Kontrolle, ob die Option akzeptiert wurde, bitte eingeben:
root@deb7:~# mount |  tail -1
/home/virtdisk/hdd01.img on /mnt type xfs (rw,relatime,attr2,delaylog,usrquota)
Ein Hard- und Soft-Limit kann für einen speziellen Benutzer so gesetzt werden:
root@deb7:~# xfs_quota -xc 'limit bsoft=10m bhard=20m tux' /mnt
Ein Default-Limit, was für alle Benutzer gilt, lässt sich mit -d setzen:
root@deb7:~# xfs_quota -xc 'limit bsoft=5m bhard=10m -d' /mnt
Entfernen lässt sich ein Kontingent für einen Nutzer, indem man beide Werte auf 0 setzt:
root@deb7:~# xfs_quota -xc 'limit bsoft=0 bhard=0 tux' /mnt
Das Standard-Kontingent lässt sich entsprechend so entfernen:
root@deb7:~# xfs_quota -xc 'limit bsoft=0 bhard=0 root' /mnt
Zum Testen des Ganzen legen wir ein Verzeichnis an, in dem Benutzer Schreibrechte haben:
root@deb7:~# mkdir -m 777 /mnt/Daten
Nun werden wir tux und probieren aus, ob nun keine solch große Datei mehr erzeugt werden kann:
root@deb7:~# su - tux
tux@deb7:~$ dd if=/dev/zero of=/mnt/Daten/bigfile bs=1M count=50
   => dd: Schreiben von "/mnt/Daten/bigfile": Der zugewiesene Plattenplatz (Quota) ist überschritten
tux@deb7:~$ exit
Wieviel Speicherplatz verbraucht wird, lässt man sich so ausgeben:
root@deb7:~# xfs_quota -xc 'report -h' /mnt
Benutzer Quota auf /mnt (/dev/loop0)
                        Blöcke
Benutzer ID   Benutzt Weich  Hart Warnung/Gnadenfrist
---------- ---------------------------------
root            0      0      0  00 [------]
tux         20,0M    10M    20M  00 [6 Tage]
Siehe dazu auch:
http://xfs.org/docs/xfsdocs-xml-dev/XFS_User_Guide/tmp/en-US/html/xfs-quotas.html
https://solidlinux.wordpress.com/2012/12/09/xfs-quota-managament/
Prüfen und Reparieren
Wir erstellen auf dem xfs-Volume eine Testdatei, schreiben etwas hinein und nach einem Zwischenspeichern suspendieren wir den Editor mit STRG + Z in den Hintergrund der bash. Danach kontrollieren wir gleich noch, ob es die Auslagerungsdatei mit führendem Punkt (dotfile) gibt:
root@deb7:~# vi /mnt/testdatei

[1]+  Angehalten              vi /mnt/testdatei
root@deb7:~# jobs
[1]+  Angehalten              vi /mnt/testdatei
root@deb7:~#
root@deb7:~# ls -la /mnt/
insgesamt 69
drwxr-xr-x  2 root root   43 Aug 26 12:33 .
drwxr-xr-x 23 root root 1024 Aug 26 11:54 ..
-rw-r--r--  1 root root    4 Aug 26 12:33 testdatei
-rw-------  1 root root 4096 Aug 26 12:33 .testdatei.swp
Jetzt simulieren wir eine unerwünschte Situation: Das Dateisystem wird unsauber mit -l (lazy, unmounting a busy disk) ausgehängt:
umount -l /mnt
Ein erster Versuch, das Dateisystem zu überprüfen, schlägt fehl: i
root@deb7:~# xfs_check  hdd01.img
FEHLER: Das Dateisystem hat wertvolle Metadaten-Änderungen in einem
Protokoll, das wiederholt werden sollte. Hängen Sie das Dateisystem ein,
um das Protokoll zu wiederholen und hängen Sie es wieder aus before Sie
xfs_check erneut auszuführen. Wenn Sie außer Stande sind, das Dateisystem
einzuhängen, benutzen Sie die xfs_repair-Option -L, um das Protokoll zu
zerstören und versuchen Sie eine Reparatur.
Beachten Sie, dass die Zerstörung des Protokolls Schaden verursachen
kann -- bitte versuchen Sie, das Dateisystem einzuhängen ehe Sie dies tun.
root@deb7:~#
Diesen Rat wollen wir gern beherzigen, aber das Remounten gelingt überhaupt nicht:
root@deb7:~# mount -o uquota hdd01.img /mnt
mount: wrong fs type, bad option, bad superblock on /dev/loop3,
       missing codepage or helper program, or other error
       Manchmal liefert das Syslog wertvolle Informationen – versuchen
       Sie  dmesg | tail  oder so

root@deb7:~#
Deshalb muss jetzt gemäß der obigen Hinweise von xfs_check eine Reparatur mit xfs_repair erfolgen:
root@deb7:~# xfs_repair -L /dev/loop3
Phase 1 - Superblock finden und überprüfen...
Phase 2 - ein internes Protokoll benutzen
        - Null-Protokoll...
ALARM: Das Dateisystem hat wertvolle Metadaten-Änderungen in einem
Protokoll, das zerstört wird, weil die -L-Option benutzt wird.
        - freier Speicher und Inode-Karten des Dateisystems werden
gescannt...
sb_ifree 60, counted 58
sb_fdblocks 126778, counted 126761
        - Wurzel-Inode-Stück gefunden
Phase 3 - für jedes AG...
        - agi unverknüpfte Listen werden gescannt und bereinigt...
        - bekannte Inodes werden behandelt und Inode-Entdeckung wird
durchgeführt...
        - agno = 0
        - agno = 1
        - agno = 2
        - agno = 3
        - neu entdeckte Inodes werden behandelt...
Phase 4 - auf doppelte Blöcke überprüfen...
        - Liste mit doppeltem Ausmaß wird eingerichtet...
        - es wird geprüft ob Inodes Blocks doppelt beanspruchen...
        - agno = 0
        - agno = 1
        - agno = 2
        - agno = 3
Phase 5 - AG-Köpfe und Bäume werden erneut gebildet...
        - Superblock wird zurückgesetzt...
Phase 6 - Inode-Verbindbarkeit wird geprüft...
        - Inhalte der Echtzeit-Bitmaps und Zusammenfassungs-Inodes werden zurückgesetzt
        - Dateisystem wird durchquert ...
        - durchqueren beendet ...
        - nicht verbundene Inodes werden nach lost+found verschoben ...
Phase 7 - Verweisanzahl wird geprüft und berichtigt...
Anmerkung - Quota-Information wird beim nächsten Einhängen des Quotas neu
erzeugt
erledigt
root@deb7:~#
Ein erneuter Check bringt nun auch keine Fehlermeldungen mehr hervor:
root@deb7:~# xfs_check /dev/loop3
root@deb7:~#
Aber trotzdem gelingt das Mounten noch nicht, nach einem dmesg sehen wir, warum:
root@deb7:~# mount -o uquota hdd01.img  /mnt
mount: wrong fs type, bad option, bad superblock on /dev/loop4,
       missing codepage or helper program, or other error
       Manchmal liefert das Syslog wertvolle Informationen – versuchen
       Sie  dmesg | tail  oder so

root@deb7:~# dmesg | tail
[10686.076205] XFS (loop2): Quotacheck: Done.
[11898.557440] XFS (loop2): Mounting Filesystem
[11898.563474] XFS (loop2): Ending clean mount
[12114.800798] XFS (loop3): Filesystem has duplicate UUID - can't mount
[12132.703194] XFS (loop3): Filesystem has duplicate UUID - can't mount
[12202.378219] XFS (loop3): Filesystem has duplicate UUID - can't mount
[12294.041160] XFS (loop3): Filesystem has duplicate UUID - can't mount
[12299.554721] XFS (loop3): Filesystem has duplicate UUID - can't mount
[12305.747535] XFS (loop3): Filesystem has duplicate UUID - can't mount
[12327.221897] XFS (loop4): Filesystem has duplicate UUID - can't mount
root@deb7:~#
Als Workaround gibt es jetzt die Möglichkeit, das Device mit der Option nouuid einzuhängen:
root@deb7:~# mount -o uquota,nouuid hdd01.img  /mnt
root@deb7:~#
root@deb7:~# ls /mnt/ -l
insgesamt 4
-rw-r--r-- 1 root root 4 Aug 26 12:33 testdatei
root@deb7:~#
Das allerdings ist natürlich nicht die feine Art, das Problem beheben wir mit Hilfe von xfs_admin:
root@deb7:~# umount /mnt
root@deb7:~#
root@deb7:~# xfs_admin -U generate hdd01.img
Protokoll wird geleert und UUID gesetzt
Schreiben aller SBs
neue UUID = c9833afc-c31b-408c-a667-a5073b89e53f
root@deb7:~#
Schlussendlich gelingt das Mounten wieder ohne die Option nouuid:
root@deb7:~# mount -o uquota hdd01.img  /mnt
root@deb7:~#
root@deb7:~# cat /mnt/testdatei
123
root@deb7:~#
Detailinformationen über das Dateisystem kann man sich mit xfs_info ausgeben lassen, das Device muss dabei gemountet sein:
root@deb7:~# xfs_info  /mnt/
Metadaten =/dev/loop4             isize=256    agcount=4, agsize=32000 blks
          =                       sectsz=512   attr=2
Daten     =                       bsize=4096   Blöcke=128000, imaxpct=25
          =                       sunit=0      swidth=0 blks
Benennung =Version 2              bsize=4096   ascii-ci=0
Protokoll =Intern                 bsize=4096   Blöcke=1200, Version=2
          =                       sectsz=512   sunit=0 blks, lazy-count=1
Echtzeit  =keine                  extsz=4096   Blöcke=0, rtextents=0
Siehe dazu auch:
Das Dateisystem btrfs
Falls nicht schon geschehen, lassen sich die btrfs-Tools mittels apt-get install btrfs-progs installieren.
Auf einem Debian 10 stehen dann im Wesentlichen diese Binaries zur Verfügung (‚btrfs-convert‘ wird hier nicht mehr ausgeliefert, siehe https://wiki.debian.org/Btrfs):
root@d10-efi:~# dpkg -L btrfs-progs | grep bin
/bin
/bin/btrfs
/bin/btrfs-find-root
/bin/btrfs-image
/bin/btrfs-map-logical
/bin/btrfs-select-super
/bin/btrfstune
/bin/fsck.btrfs
/bin/mkfs.btrfs
/bin/btrfsck
root@d10-efi:~#
Mit dd if=/dev/zero of=/home/vhd count=0 bs=1 seek=512M erzeugen wir uns ein Sparse File, das wir für die folgenden Experimente nutzen wollen:
root@deb8:~# ls -lisa /home/vhd
6884 0 -rw-r--r-- 1 root root 1073741824 Jan 20 13:00 /home/vhd
root@deb8:~#
root@deb8:~# mkfs.btrfs /home/vhd
Btrfs v3.17
See http://btrfs.wiki.kernel.org for more information.

Turning ON incompat feature 'extref': increased hardlink limit per file to 65536
ERROR: device scan failed '/home/vhd' - Block device required
fs created label (null) on /home/vhd
        nodesize 16384 leafsize 16384 sectorsize 4096 size 1.00GiB
root@deb8:~#
root@deb8:~# PS1="$ "
$
$ mount /home/vhd /mnt/
$
$ cp /etc/host* /mnt/
$
$ cd /mnt/
$
$ ls -la
insgesamt 40
drwxr-xr-x  1 root root   86 Jan 20 13:05 .
drwxr-xr-x 23 root root 4096 Jan 11 08:50 ..
-rw-r--r--  1 root root    9 Jan 20 13:05 host.conf
-rw-r--r--  1 root root    3 Jan 20 13:05 hostname
-rw-r--r--  1 root root  197 Jan 20 13:05 hosts
-rw-r--r--  1 root root  411 Jan 20 13:05 hosts.allow
-rw-r--r--  1 root root  711 Jan 20 13:05 hosts.deny
$

$ btrfs sub create foo
Create subvolume './foo'
$
$ ls -la
insgesamt 40
drwxr-xr-x  1 root root  112 Jan 20 13:06 .
drwxr-xr-x 23 root root 4096 Jan 11 08:50 ..
drwxr-xr-x  1 root root    0 Jan 20 13:09 foo
-rw-r--r--  1 root root    9 Jan 20 13:05 host.conf
-rw-r--r--  1 root root    3 Jan 20 13:05 hostname
-rw-r--r--  1 root root  197 Jan 20 13:05 hosts
-rw-r--r--  1 root root  411 Jan 20 13:05 hosts.allow
-rw-r--r--  1 root root  711 Jan 20 13:05 hosts.deny
drwxr-xr-x  1 root root    0 Jan 20 13:06 .snapshots
$
$ ls -la foo/
insgesamt 16
drwxr-xr-x 1 root root   0 Jan 20 13:09 .
drwxr-xr-x 1 root root 112 Jan 20 13:06 ..
$
$ cp /etc/su
subgid     subgid-    subuid     subuid-    sudoers    sudoers.d/
$ cp /etc/sub* foo/
$
$ ls -la foo/
insgesamt 32
drwxr-xr-x 1 root root  52 Jan 20 13:11 .
drwxr-xr-x 1 root root 112 Jan 20 13:06 ..
-rw-r--r-- 1 root root 586 Jan 20 13:11 subgid
-rw------- 1 root root 563 Jan 20 13:11 subgid-
-rw-r--r-- 1 root root 586 Jan 20 13:11 subuid
-rw------- 1 root root 563 Jan 20 13:11 subuid-
$
$ btrfs sub snap -r foo/ .snapshots/
Create a readonly snapshot of 'foo/' in '.snapshots//foo'
$
$ ls -la .snapshots/
insgesamt 16
drwxr-xr-x 1 root root   6 Jan 20 13:12 .
drwxr-xr-x 1 root root 112 Jan 20 13:06 ..
drwxr-xr-x 1 root root  52 Jan 20 13:11 foo
$
$
$ #  a) btrfs sub create foo
$
$ ls -l foo/
insgesamt 16
-rw-r--r-- 1 root root 586 Jan 20 13:11 subgid
-rw------- 1 root root 563 Jan 20 13:11 subgid-
-rw-r--r-- 1 root root 586 Jan 20 13:11 subuid
-rw------- 1 root root 563 Jan 20 13:11 subuid-
$
$ #  b) btrfs sub snap -r foo/ .snapshots/
$
$
$ rm -f .snapshots/foo/subgid
rm: das Entfernen von „.snapshots/foo/subgid“ ist nicht möglich: Das Dateisystem ist nur lesbar
$
$ rm -f foo/subgid
$
$ rm -f foo/subgid
$
$ rm  foo/subgid
rm: das Entfernen von „foo/subgid“ ist nicht möglich: Datei oder Verzeichnis nicht gefunden
$
$
$ cp .snapshots/foo/subgid foo/
$
$
$ ls -l foo/
insgesamt 16
-rw-r--r-- 1 root root 586 Jan 20 14:16 subgid
-rw------- 1 root root 563 Jan 20 13:11 subgid-
-rw-r--r-- 1 root root 586 Jan 20 13:11 subuid
-rw------- 1 root root 563 Jan 20 13:11 subuid-
$
$ sum foo/subgid .snapshots/foo/subgid
24899     1 foo/subgid
24899     1 .snapshots/foo/subgid
$
$ md5sum foo/subgid .snapshots/foo/subgid
e6ae5a4d33ff54532ce59109baf55118  foo/subgid
e6ae5a4d33ff54532ce59109baf55118  .snapshots/foo/subgid
$
203.3 Creating and configuring filesystem options
ZIEL: Standalone-Daemon für automatisches Mounten vor allem in Netzwerken (Stichworte: NFS, Roaming Profiles) aber auch per Mausklick, falls andere Mechanismen nicht in Frage kommen. Siehe dazu die Grafik unter https://8gwifi.org/docs/autofs.jsp (Hinweis: sie ist offenbar von Solaris Unix entlehnt, die Datei /etc/mnttab entspricht in etwa unserer /etc/mtab).
root@host:~ # apt-get install autofs
Die wichtigste Konfigurationsdatei ist die ‚/etc/auto.master‘, wir kommentieren nur eine Zeile ein:
/misc /etc/auto.misc
- Wir wollen USB-Speichersticks automatisch mounten, deshalb bearbeiten wir die indirekte Map-Datei, welche die eigentlichen Mountpunkte definiert
‚/etc/auto.misc‘ und schreiben folgendes hinein:
# Mountpkt unter /misc  Dateisystemtyp          Blockgerät
usb1                    -fstype=auto            :/dev/sdb1
usb2                    -fstype=auto            :/dev/sdc1
usb3                    -fstype=auto            :/dev/sdd1
usb4                    -fstype=auto            :/dev/sde1
Zum Testen nehmen wir nun den Stick her und reichen ihn via VirtualBox („Geräte“, -> „USB“ …) in den Gast hinein. Gemäß der Ausgabe von:
root@host:~ # dmesg | grep sd
versuchen wir einen ersten Zugriff:
root@host:~ # ls -l /misc/usb3
Da dies wegen dem NTFS-Dateisystemn nicht auf Anhieb gelingt, wüssen wir folgendes tun:
root@host:~ # ### Testweise manuell mounten:
root@host:~ # mount -t ntfs-3g /dev/sdd1 /mnt/
Mount is denied because the NTFS volume is already exclusively opened.
The volume may be already mounted, or another software may use it which
could be identified for example by the help of the 'fuser' command.
root@host:~ #
root@host:~ #
root@host:~ # systemctl stop autofs.service
root@host:~ #
root@host:~ #
root@host:~ # mount -t ntfs-3g /dev/sdd1 /mnt/
Mount is denied because the NTFS volume is already exclusively opened.
The volume may be already mounted, or another software may use it which
could be identified for example by the help of the 'fuser' command.
root@host:~ #
root@host:~ # mount | tail -1
/dev/sdd1 on /mounts type fuseblk (rw,relatime,user_id=0,group_id=0,allow_other,blksize=4096)
root@host:~ #
root@host:~ # ls -l /mounts
ls: Zugriff auf /mounts nicht möglich: Der Socket ist nicht verbunden
root@host:~ #

root@host:~ # ### Deaktivieren der udev-Regel für diesen Stick
root@host:~ # vi /etc/udev/rules.d/88-mystick.rules
root@host:~ #
root@host:~ # udevadm trigger
root@host:~ #
root@host:~ # mount | tail -1
/dev/sdd1 on /mounts type fuseblk (rw,relatime,user_id=0,group_id=0,allow_other,blksize=4096)
root@host:~ #
root@host:~ # umount /mounts
root@host:~ # umount /mounts
umount: /mounts: not mounted
root@host:~ #
root@host:~ # mount -t ntfs-3g /dev/sdd1 /mnt/
root@host:~ #
root@host:~ # mount | tail -1
/dev/sdd1 on /mnt type fuseblk (rw,relatime,user_id=0,group_id=0,allow_other,blksize=4096)
root@host:~ #
Nach der Änderung des Dateisystemtyps auf ‚ntfs-3g‘ läuft es dann:
root@host:~ # grep -v ^#  /etc/auto.misc
cd            -fstype=iso9660,ro,nosuid,nodev :/dev/cdrom
usb1                  -fstype=auto            :/dev/sdb1
usb2                  -fstype=auto            :/dev/sdc1
usb3                  -fstype=ntfs-3g         :/dev/sdd1
usb4                  -fstype=auto            :/dev/sde1
root@host:~ #
root@host:~ #
root@host:~ # systemctl restart autofs
root@host:~ #
root@host:~ # ls -l /misc/usb3
insgesamt 4
drwxrwxrwx 1 root root    0 Jan 16 14:54 boot
drwxrwxrwx 1 root root    0 Jan 18 14:08 Dokumente
drwxrwxrwx 1 root root 4096 Jan 18 21:15 ISO
drwxrwxrwx 1 root root    0 Jan 18 14:37 System Volume Information
root@host:~ #
Welcher Standardwert für das automatische Aushängen verwendet wird, lässt sich in der man-Page von ‚auto.master‘ nachlesen (timeout); das sind 10 Minuten. Wie ändern es für unser map-File auf eine Minute (‘–timeout=1‘):
root@host:~ # grep timeo /etc/auto.master
/misc       /etc/auto.misc --timeout=1
root@host:~ #
HINWEIS: Unter Debian 10 funktioniert das automatische Aushängen nicht, wenn parallel der Systemd-Automounter werkelt! Dies passiert z.B. mit solch einer Zeile in der /etc/fstab:
LABEL=Volume6 /media/vol6 ext2 noauto,x-systemd.automount,x-systemd-timeout=10,x-systemd.idle-timeout=1min 0 2
Workaround: Falls man auf solch ein zusätzliches x-systemd.automount nicht verzichten möchte, können als weitere Optionen „sync,nodev,nosuid“ mitgegeben werden, insgesamt also: /misc /etc/auto.misc --timeout=1,sync,nodev,nosuid Am besten ist aber, nur einen von den beiden Automountern zu betreiben.
Siehe dazu auch hier bei Manjaro Linux .
Symlink für einfacheren Zugriff erzeugen: Sinnvollerweise legt man sich einen symbolischen Link auf den nicht sichtbaren Mountpunkt an:
root@host:~ # ln -s /misc/usb3 /media/stick-number3
Falls der Link innerhalb von $HOME liegen soll, ist es ratsam, ein separates Unterverzeichnis zu benutzen, weil manche Desktops beim Öffnen des Dateimanagers dem Symlink sofort folgen und dabei bereits das automatische Mounten auslösen:
root@host:~ # mkdir /home/tux/Laufwerke
root@host:~ # ln -s /misc/usb3 /home/tux/Laufwerke/myStickNr3
Erforschung des automount-Daemons
1983  umount -a
1984  ## umount -a
1985  modprobe -r fuse
1986  mount | grep sdd
1987  mount | grep sd
1988  lsblk
1989  history 12
root@deb8:~#
root@deb8:~# mount | grep sd
root@deb8:~# mount | grep sd
root@deb8:~#
root@deb8:~# grep ^/mi /etc/auto.master
/misc       /etc/auto.misc --timeout=1
root@deb8:~#
root@deb8:~# ls -la /misc/
insgesamt 4
drwxr-xr-x  2 root root    0 Jan 23 13:02 .
drwxr-xr-x 26 root root 4096 Jan 23 13:02 ..
root@deb8:~#
root@deb8:~# cd /media/stick-number3
root@deb8:/media/stick-number3# ls -a
.  ..  boot  Dokumente  ISO  System Volume Information
root@deb8:/media/stick-number3#
Einrichtung einer NFS-Freigabe, um das /net-Target von Autofs testen zu können:
root@deb8:/media/stick-number3# apt-get install nfs-kernel-server
root@deb8:/media/stick-number3# ## echo '/srv  127.0.0.1(rw)' >> /etc/exports
root@deb8:/media/stick-number3#
root@deb8:/media/stick-number3# ## /etc/init.d/rpcbind start
root@deb8:/media/stick-number3#
root@deb8:/media/stick-number3# ## /etc/init.d/nfs-kernel-server restart
root@deb8:/media/stick-number3#
root@deb8:/media/stick-number3# showmount -e 127.0.0.1
Export list for 127.0.0.1:
/srv 127.0.0.1
root@deb8:/media/stick-number3#
root@deb8:/media/stick-number3# mount 127.0.0.1:/srv /mnt
root@deb8:/media/stick-number3#
root@deb8:/media/stick-number3# ls -l /mnt/
insgesamt 12
drwxr-xr-x 2 root ftp  4096 Dez 19 10:16 ftp
drwxr-xr-x 4 root root 4096 Jan 19 11:43 tftp
drwxr-xr-x 2 root root 4096 Dez 15 15:24 webshare
root@deb8:/media/stick-number3#
root@deb8:/media/stick-number3# umount /mnt
root@deb8:/media/stick-number3#

root@deb8:/media/stick-number3# vi /etc/auto.master
root@deb8:/media/stick-number3#
root@deb8:/media/stick-number3# grep -v ^# /etc/auto.master | grep -v ^$
/misc       /etc/auto.misc --timeout=1
/net        -hosts
+dir:/etc/auto.master.d
+auto.master
root@deb8:/media/stick-number3#
root@deb8:/media/stick-number3# ls -l /net
ls: Zugriff auf /net nicht möglich: Datei oder Verzeichnis nicht gefunden
root@deb8:/media/stick-number3#
root@deb8:/media/stick-number3#
root@deb8:/media/stick-number3# /etc/init.d/autofs reload
[ ok ] Reloading autofs configuration (via systemctl): autofs.service.
root@deb8:/media/stick-number3#
root@deb8:/media/stick-number3#
root@deb8:/media/stick-number3# ls -l /net
ls: Zugriff auf /net nicht möglich: Datei oder Verzeichnis nicht gefunden
root@deb8:/media/stick-number3# ###  => ein 'reload' reicht scheinbar NICHT aus
root@deb8:/media/stick-number3#
root@deb8:/media/stick-number3# /etc/init.d/autofs restart
[ ok ] Restarting autofs (via systemctl): autofs.service.
root@deb8:/media/stick-number3# ls -l /net
insgesamt 0
root@deb8:/media/stick-number3# ### => es muss tatsächlich ein 'restart' erfolgen, um den Mountpunkt '/net' zu erzeugen!
Wir arbeiten jetzt mit diese Konfiguration weiter:
root@deb8:~# grep -v ^# /etc/auto.master | grep -v ^$
/misc /etc/auto.misc --timeout=1
/miscXYZ      /etc/auto.misc --timeout=1
+dir:/etc/auto.master.d
+auto.master
root@deb8:~#
Zum Monitoring bietet sich diese Zeile an:
root@host:~ # watch -n1 -d "pstree -pn | grep -i auto"
Außerdem kann man den Daemon stoppen und mit automount -f -v im Vordergrund laufen lassen.
Dabei beobachten wir folgendes:
Die Map-Datei kann mehrfach verwendet werden, siehe ‚/miscXYZ‘ („Nur ein Eintrag in der master map kann sich auf die jeweilige map beziehen.“ ist falsch!)
Es muss ein ‚restart‘ erfolgen, ein ‚reload‘ reichte bei Debian 8 nicht aus.
Änderungen in indirekten map-Files werden on-the-fly eingelesen (Umbenennen des mount-Targets: „usb3“ => „stick3“)
Eine schwierige Frage dazu von http://www.4easytest.net/test/117-201-a-2843.html
2016 Dec 117-201 free question
Q31. You have elected to use the automounter and the autofs script. Your /etc/auto.master file contains the following:

 /home /etc/auto.home
 /project /etc/auto.project
 /data yp:data.map

If you change the contents of /etc/auto.project to include a new source path what must be done to access the new path?

  A. Shutdown and restart the local NFS client daemons.
  B. Run fsck on the affected mount point.
  C. Issue the /etc/init.d/autofs reload command.
  D. Add the newly mapped path to /etc/fstab.
  E. Nothing. Simply access the newly mapped resource.

Answer: E
Und diese Antwort stimmt tatsächlich: Änderungen in den untergeordneten Map-Dateien werden automatisch übernommen!
Zusammenfassend lässt sich sagen, dass „autofs“ mit dem „automount“-Daemon zwar nicht die intelligenteste Lösung darstellt (kein automatisches Benutzen von Labeln und UUIDs), aber sehr zuverlässig funktioniert.
Mit dem Aufeinanderstapeln von folgenden Komponenten arbeiten die Desktops natürlich viel besser (als Schichtenmodell verdeutlicht):
- Layer 3
Dateimanager (z.B. PCmanFM mountet automatisch)
- Layer 2
dbus (Desktop Bus informiert über neue Teilnehmer)
- Layer 1
udev (Hardwareerkennung, /dev verwalten,
udevadm monitor, /etc/udev/rules.d/*.rules)
CDs/DVDs erzeugen
Optische Datenträger werden in zwei Schritten mit Daten befüllt:
ISO9660-Dateisystem erzeugen: mkisofs, genisoimage
Auf den opt. Datenträger bringen:
Cmdline: cdrecord, wodim, Für DVD/CDs allg. verfügbar: growisofs
k3b (KDE), brasero (Gnome), X-CD-Roast, …
Zum ersten Schritt, dem Erzeugen von ISO-Daten:
my@bash $ apt-get install genisoimage
Paketlisten werden gelesen...

    (gekürzt)

my@bash $ ## Damit wir es wie früher mit 'mkisofs' ansprechen können:
my@bash $ ln -s /usr/bin/genisoimage /usr/local/bin/mkisofs
my@bash $
my@bash $ mkisofs -r -J -l -ldots -o /root/etc.iso /etc

Warning: creating filesystem that does not conform to ISO-9660.
I: -input-charset not specified, using utf-8 (detected in locale settings)
Using ORG_GNOME_SETTINGSDAE000.DESKTO;1 for  /etc/xdg/autostart/org.gnome.SettingsDaemon.ScreensaverProxy.desktop

   (gekürzt)

Using SNAP_GNOME_X2D3_X2D34_000.MOUNT;1 for  /etc/systemd/system/snap-gnome\x2d3\x2d34\x2d1804-60.mount (snap-gnome\x2d3\x2d34\x2d1804-36.mount)
Using SNAP_GNOME_X2D3_X2D34_000.MOUNT;1 for  /etc/systemd/system/multi-user.target.wants/snap-gnome\x2d3\x2d34\x2d1804-60.mount (snap-gnome\x2d3\x2d34\x2d1804-36.mount)
Using MAIL000.;1 for  /etc/alternatives/mail (Mail)
Using MAIL_1000.GZ;1 for  /etc/alternatives/Mail.1.gz (mail.1.gz)
 80.74% done, estimate finish Wed Nov  4 12:22:13 2020
Total translation table size: 0
Total rockridge attributes bytes: 441764
Total directory bytes: 1286144
Path table size(bytes): 7644
Max brk space used 363000
6203 extents written (12 MB)
my@bash $
my@bash $ file /root/etc.iso
/root/etc.iso: ISO 9660 CD-ROM filesystem data 'CDROM'
my@bash $
my@bash $ mount -o loop,ro /root/etc.iso /mnt
my@bash $
my@bash $ ls -l /mnt/passwd
-r--r--r-- 1 root root 3745 Nov  4 09:35 /mnt/passwd
my@bash $
my@bash $ ls -l /mnt/shadow
-r--r--r-- 1 root root 2583 Nov  4 09:35 /mnt/shadow
my@bash $
my@bash $ #   >> Die Rechte für die shadow sind plötzlich falsch!!
my@bash $
my@bash $ ls -l /etc/shadow
-r--r----- 1 root shadow 2583 Nov  4 09:35 /etc/shadow
my@bash $
my@bash $ umount /mnt
my@bash $
my@bash $
my@bash $ man genisoimage
my@bash $
my@bash $ #   >> In der Praxis '-R' anstelle von '-r' verwenden, damit die Dateirechte erhalten bleiben!
my@bash $
my@bash $ mkisofs -RJ -o /root/etc.iso /etc > /dev/null 2>&1 && echo Fertisch.
Fertisch.
my@bash $
my@bash $ mount -o loop,ro /root/etc.iso /mnt
my@bash $ ls -l /mnt/shadow
-r--r----- 1 root shadow 2583 Nov  4 09:35 /mnt/shadow
my@bash $
my@bash $ ls -l /etc/shadow
-r--r----- 1 root shadow 2583 Nov  4 09:35 /etc/shadow
my@bash $
my@bash $ #   >> Jetzt ist es in Ordnung  :-)
Zu UDF:
https://de.wikipedia.org/wiki/Packet-Writing
Das „Universal Disk Format“ ist ein spezielles Dateisystem, das dann das spätere „inkrementelle Beschreiben“ mit dem Laser unterstützt.
Tipp zu cdrecord/wodim: Es lässt sich der Bus einfach scannen, womit u.U. auch andere Geräte entdeckt werden:
cdrecord -scanbus# Siehe dazu https://linuxwiki.de/cdrecord
Verschlüsselung von Datenträgern
Die sicherste Software ist hierbei LUKS/crypsetup, siehe https://wiki.ubuntuusers.de/LUKS/
Wichtige Features:
Einzelne Dateien verschlüsseln (= Container, in der Art von Password Safes)
Ganze Partitionen verschlüsseln, z.B. $HOME automatisch via PAM (Debian-Paket libpam-mount)
Vollverschlüsselung (alles außer /boot): https://www.grund-wissen.de/linux/datensicherung/verschluesselung.html
Weitere Softwarelösungen, die als NICHT allzu sicher gelten:
eCryptfs (Partitionen und ganze Verzeichnisse verschlüsseln)
EncFs (einzelne Dateien verschlüsseln, Ideal für differentiell Backups, -> rsync)
Zu möglichen Problemen siehe:
https://blog.florianheinle.de/verschl-sselung-ecryptfs-encfs-luks
https://curius.de/schwerpunkte/cloud/encfs-dateien-in-der-cloud-verschluesseln/
https://northstar-www.dartmouth.edu/~richard/WhitePapers/FUSE.html (allg.: Probleme mit zugrundeliegenden fuse-Treibern!)
Zur Verschlüsselung mit LUKS (Einrichtung und Benutzung eines Dateicontainers „cfile-01.img“):
- Ersteinrichtung:
apt-get install cryptsetup haveged(Software installieren)haveged -n 0 | dd of=cfile-01.img bs=1M count=300 iflag=fullblock(Mit Zufallszahlen Imagedatei erzeugen)cryptsetup luksFormat cfile-01.img(Mit YES zu bestätigen, Passphrase setzen))cryptsetup luksOpen cfile-01.img cryptCon1(Image entsperren, dazu obige Passphrase eingeben)mke2fs /dev/mapper/cryptCon1(Dateisystem aufbringen, am sichersten eins OHNE Journal wählen)
- Benutzung:
cryptsetup luksOpen cfile-01.img cryptCon1(falls nicht schon erfolgt, Image mit Passphrase entsperren)mount /dev/mapper/cryptCon1 /mnt/(Device mounten)rsync -av <QUELLE/> /mnt/<ZIEL/>(Daten kopieren etc.)umount /mnt(Dateicontainer wieder aushängen)cryptsetup luksClose cryptCon1(Image wieder sperren, kein Mounten ohne Eingabe der Passphrase!)
- Schlüsselverwaltung:
cryptsetup luksAddKey cfile-01.img(Weitere Passphrasen hinterlegen, bis max. 8 Key-Slots nutzbar)cryptsetup luksDump cfile-01.img(Eigenschaften ausgeben, z.B. die verwendeten Key-Slots)cryptsetup luksHeaderBackup cfile-01.img --header-backup-file cfile-01.header(Header sichern)
Zum Erstellen von weiteren Passphrasen und zum Sichern des Headers siehe auch https://www.my-it-brain.de/wordpress/datentraeger-unter-linux-mit-cryptsetup-luks-verschluesseln/
Tipp zum Device Mapper: Mittels dmsetup info kann man nachsehen, ob und welche Geräte derzeit verfügbar sind (via LUKS oder LVM bereitgestellt). Siehe auch https://www.linuxtopia.org/online_books/rhel6/rhel_6_lvm_admin/rhel_6_lvm_dmsetup.html
Topic 204: Advanced Storage Device Administration
204.1 Configuring RAID
Zu den Grundlagen:
Level 0 = Performance-Gewinn durch Stripe-Sets, ABER KEINE REDUNDANZ/Sicherheit!!!
Level 1 = Redundanz durch Kopiervorgänge, -> Mirror (langsam!)
Level 5 = Performance-Gewinn dank Stripe-Sets, Sicherheit durch separate gespeicherte Parity-Informationen
Level 10 = Kombination von 1 und 0: über einen Mirror wird ein Stipe-Set gebaut.
Speziell zu RAID 5:
Die kleinste Festplatte ist für die Endgröße des RAIDs ausschlaggebend
Zur Berechnung der Kapazität siehe https://www.gservon.de/erklaerung-und-berechnung-raid-0-1-5-6-und-10/ - so bleiben bei 3 gleich großen Festplatten nur 2/3 der Gesamtkapazität einer Festplatte übrig: 3x 1TB => 2TB
Aus LPI: „What is the usable disk space of a RAID 5 array of five 18GB drives with one drive dedicated as a spare?“ Richtige Antwort: 54 GB
Zur praktischen Einrichtung:
Das veraltete Kommando nennt sich ‚mkraid‘ mit seiner Konfigdatei ‚/etc/raidtab‘, heutzutage verwenden wir aber ‚mdadm‘ mit der Datei ‚/etc/mdadm/mdadm.conf‘:
root@host:~ # apt-get install mdadm

  => Unter Debian 8 fragt der Assistent nach den einzuhängenden RAID-Verbünden: "all"
Nach dem Einbauen von drei weiteren Festplatten:
root@host:~ # lsblk
NAME   MAJ:MIN RM  SIZE RO TYPE MOUNTPOINT
sda      8:0    0   50G  0 disk
├─sda1   8:1    0   28G  0 part /
├─sda2   8:2    0  954M  0 part [SWAP]
├─sda3   8:3    0  9,3G  0 part /home
└─sda4   8:4    0 11,8G  0 part /srv/vhosts/user
sdb      8:16   0    8G  0 disk
sdc      8:32   0    8G  0 disk
sdd      8:48   0    8G  0 disk
sr0     11:0    1 1024M  0 rom
root@host:~ #
Erzeugung eines RAID 5 Systems
Mit der folgenden Kommandozeile geschieht die Einrichtung, danach steht es sofort zur Verfügung:
root@host:~ # mdadm --create --verbose /dev/md0 --level=5 --raid-devices=3 /dev/sdb /dev/sdc /dev/sdd
mdadm: layout defaults to left-symmetric
mdadm: layout defaults to left-symmetric
mdadm: chunk size defaults to 512K
mdadm: size set to 8380416K
mdadm: Defaulting to version 1.2 metadata
mdadm: array /dev/md0 started.
root@host:~ #
Zur Kontrolle des RAID-Aufbaus führen wir watch -n1 -d cat /proc/mdstat aus (mit STRG-C später zu beenden), solange dabei aber so etwas wie [=========>...........] recovery = 45.9% ... zu sehen ist, heißt es abzuwarten und nicht etwa den Rechner neu zu starten! Wenn alles i.O. ist, sollte es im Endeffekt so aussehen:
root@host:~ # cat /proc/mdstat
Personalities : [raid6] [raid5] [raid4]
md0 : active raid5 sdd[3] sdc[1] sdb[0]
    16760832 blocks super 1.2 level 5, 512k chunk, algorithm 2 [3/3] [UUU]

unused devices: <none>
root@host:~ #
Oder viel ausführlicher:
root@host:~ # mdadm --detail /dev/md0
/dev/md0:
    Version : 1.2
  Creation Time : Tue Jan 24 09:14:29 2017
    Raid Level : raid5
    Array Size : 16760832 (15.98 GiB 17.16 GB)
  Used Dev Size : 8380416 (7.99 GiB 8.58 GB)
  Raid Devices : 3
  Total Devices : 3
    Persistence : Superblock is persistent

    Update Time : Tue Jan 24 09:15:25 2017
      State : clean
Active Devices : 3
Working Devices : 3
Failed Devices : 0
  Spare Devices : 0

    Layout : left-symmetric
    Chunk Size : 512K

      Name : gast2:0  (local to host gast2)
      UUID : db97df8f:ed2c3608:10551277:de3767aa
    Events : 18

    Number   Major   Minor   RaidDevice State
  0       8       16        0      active sync   /dev/sdb
  1       8       32        1      active sync   /dev/sdc
  3       8       48        2      active sync   /dev/sdd
root@host:~ #
Damit nach einem Neustart des Systemes das RAID automatisch gestartet wird, brauchen wir unter Debian 8 noch einen Eintrag in der Konfigurationsdatei, den wir ganz einfach so erzeugen:
root@host:~ # mdadm --detail --scan >> /etc/mdadm/mdadm.conf
Zur Kontrolle geben wir folgendes ein:
root@host:~ # grep -v ^# /etc/mdadm/mdadm.conf | grep -v ^$
CREATE owner=root group=disk mode=0660 auto=yes
HOMEHOST <system>
MAILADDR root
ARRAY /dev/md0 metadata=1.2 name=gast2:0 UUID=db97df8f:ed2c3608:10551277:de3767aa
root@host:~ #
HINWEIS: Bei neueren Linuxen wird das RAID automatisch zusammengesetzt, die „ARRAY“-Zeile ist nicht mehr erforderlich. Das erste Device heißt dann z.B. ‚/dev/md127‘ (siehe ‚man mdadm‘, Abschnitt „DEVICE NAMES“). Will man die Bezeichnung ‚/dev/md0‘ wiederhaben, ist wie eben beschrieben die ARRAY-Zeile hinzuzufügen, außerdem muss danach update-initramfs -u ausgeführt werden.
Man kann aber auch Namen wie „/dev/md/disk2“ in der /etc/mdadm/mdadm.conf festlegen, was dann ein Symlink zum eigentlichen Blockgerät wird. Danach wieder das initramfs updaten und nicht vergessen, den neuen Namen in der /etc/fstab anzupassen.
Formatieren und Einbinden des RAID:
root@host:~ # mkfs.ext4 /dev/md0
root@host:~ # mkdir /daten
root@host:~ #
root@host:~ # ## Falls keine Quotas gewünscht sind, 'usrquota,grpquota' einfach weglassen:
root@host:~ # echo '/dev/md0  /daten  ext4  defaults,usrquota,grpquota  0  2' >> /etc/fstab
Disk-Quotas einrichten (optional):
root@host:~ # apt-get install quota
root@host:~ # quotacheck -augvmf
quotacheck: Ihr Kernel unterstützt wahrscheinlich Journalquotas, aber Sie verwenden sie nicht (...)
quotacheck: Old user file name could not been determined. Usage will not be subtracted.
quotacheck: 1257 Verzeichnisse und 12123 Dateien geprüft
quotacheck: Prüfe /dev/md0 [/daten] fertig
root@host:~ #
Defekte Festplatten aus dem Verbund entfernen/hinzufügen
Zuerst einmal muss die defekte Platte markiert werden, so dass sie überhaupt aus dem RAID entfernt werden kann:
root@host:~ # mdadm /dev/md0 --fail /dev/sdc
mdadm: set /dev/sdc faulty in /dev/md0
root@host:~ #
root@host:~ # cat /proc/mdstat
Personalities : [raid6] [raid5] [raid4]
md0 : active raid5 sdb[0] sdd[3] sdc[1](F)
  16760832 blocks super 1.2 level 5, 512k chunk, algorithm 2 [3/2] [U_U]

unused devices: <none>
root@host:~ #
Zur dieser Statusausgabe hier ein paar Hinweise:
Rechts neben sdc[1] entdecken wir jetzt ein „(F)“, was auf den Status „faulty“ hinweist. Wenn es nun beispielsweise 4 Platten im Array gibt, sda die nicht intergrierte Bootfestplatte ist und sdb und sdd „faulty“ sind, sieht es dann so aus:
[_U_U]Bei diesen Flags gestaltet sich also die Reihenfolge einfach nach der alphabetischen Sortierung der beteiligen Platten von links nach rechts. Wenn alles in Ordnung ist, haben wir 4 mal den Status „U“p and running, in diesem Beispiel:
[  U    U    U    U  ]
  sdb  sdc  sdd  sde
Bei Spare-Disks (also Platten, die zwar zum RAID gehören, aber nur zusätzlich/überzählig mitlaufen) taucht ein weiteres Flag auf, das „(S)“. Es folgt der schließenden, eckigen Klammer des betreffenden Geräts (LPI-relevant!). Bei NVMe-Geräten kann dies z.B. so aussehen:
my@bash $ ## Ursprüngliche RAID-Erzeugung, aus drei Komponenten bestehend ('--raid-devices=3'):
my@bash $ # mdadm --create --verbose /dev/md1 --level=5 --raid-devices=3 /dev/nvme0n[1-3]
my@bash $
my@bash $ ## Eine 4. Platte als Spare Disk hinzufügen:
my@bash $ mdadm /dev/md1 --add /dev/nvme0n4
mdadm: added /dev/nvme0n4
my@bash $
my@bash $ cat /proc/mdstat
Personalities : [raid6] [raid5] [raid4] [linear] [multipath] [raid0] [raid1] [raid10]
md0 : active raid5 sdb[4] sdd[6] sdc[1]
    18800640 blocks super 1.2 level 5, 512k chunk, algorithm 2 [4/3] [UUU_]

md1 : active raid5 nvme0n4[5](S) nvme0n1[0] nvme0n2[4] nvme0n3[3]
    16758784 blocks super 1.2 level 5, 512k chunk, algorithm 2 [3/3] [UUU]

unused devices: <none>
my@bash $
HyperLinks:
Nach dem obigen mdadm /dev/md0 --fail /dev/sdc wollen wir das Gerät nun wieder hinzufügen, ohne es jedoch vorher aus dem Verbund zu lösen:
root@host:~ # mdadm /dev/md0 --re-add /dev/sdc
mdadm: re-add /dev/sdc to md0 succeed
root@host:~ #
Nach erneutem faulty-Schalten mit mdadm /dev/md0 --fail /dev/sdc soll es schließlich doch aus dem Verbund herausgenommen werden:
root@host:~ # mdadm /dev/md0 --remove /dev/sdc
mdadm: hot removed /dev/sdc from /dev/md0
root@host:~ #
root@host:~ # cat /proc/mdstat
Personalities : [raid6] [raid5] [raid4]
md0 : active raid5 sdb[0] sdd[3]
  16760832 blocks super 1.2 level 5, 512k chunk, algorithm 2 [3/2] [U_U]

unused devices: <none>
root@host:~ #
Die Platte ist nun vollständig herausgelöst, kann aber ebenfalls wieder hinzugefügt werden, jetzt allerdings mit --add:
root@host:~ # mdadm /dev/md0 --add /dev/sdc
mdadm: added /dev/sdc
root@host:~ #
root@host:~ # cat /proc/mdstat
Personalities : [raid6] [raid5] [raid4]
md0 : active raid5 sdc[4] sdb[0] sdd[3]
  16760832 blocks super 1.2 level 5, 512k chunk, algorithm 2 [3/2] [U_U]
  [=>...................]  recovery =  5.6% (475784/8380416) finish=0.8min speed=158594K/sec

unused devices: <none>
root@host:~ #
root@host:~ # cat /proc/mdstat
Personalities : [raid6] [raid5] [raid4]
md0 : active raid5 sdc[4] sdb[0] sdd[3]
  16760832 blocks super 1.2 level 5, 512k chunk, algorithm 2 [3/2] [U_U]
  [====>................]  recovery = 20.4% (1711944/8380416) finish=0.7min speed=142662K/sec

unused devices: <none>
root@host:~ #
Mit einer Festplatte, die z.B. aus einem anderen RAID stammt, gelingt das nicht so einfach, hier muss erst der Superblock gelöscht werden (Datenverlust!):
root@host:~ # mdadm --zero-superblock /dev/sdc
root@host:~ # mdadm /dev/md0 --add /dev/sdc
mdadm: added /dev/sdc
root@host:~ #
Das RAID vergrößern
Soll das RAID-5 um eine Festplatte erweitert werden, um mehr Speicherplatz zu erhalten, muss eine weitere Platte eingebaut und dem RAID hinzufügt werden:
root@host:~ # mdadm --add /dev/md0 /dev/sde
mdadm: added /dev/sde
root@host:~ #
Diese Platte ist erst einmal lediglich ein als Hot-Spare mitlaufendes, für das RAID verfügbar gemachtes Gerät. Wir müssen es nun einbinden:
root@host:~ # mdadm --grow --raid-devices=4 /dev/md0
root@host:~ #
root@host:~ # cat /proc/mdstat
Personalities : [raid6] [raid5] [raid4] [linear] [multipath] [raid0] [raid1] [raid10]
md0 : active raid5 sde[5] sdb[0] sdd[3] sdc[4]
        16760832 blocks super 1.2 level 5, 512k chunk, algorithm 2 [4/4] [UUUU]
        [>....................]  reshape =  3.0% (255488/8380416) finish=3.7min speed=36498K/sec

unused devices: <none>
root@host:~ #
Jetzt haben wir zwar die Fläche vergrößert, aber das Dateisystem weiß noch nichts davon; mit ‚resize2fs‘ wird nachgezogen:
root@host:~ # mdadm --detail /dev/md0 | grep 'Array Size'
        Array Size : 25141248 (23.98 GiB 25.74 GB)
root@host:~ #
root@host:~ # df -h /media/datastore/
Dateisystem    Größe Benutzt Verf. Verw% Eingehängt auf
/dev/md0         16G     45M   15G    1% /media/datastore
root@host:~ #
root@host:~ #
root@host:~ # resize2fs /dev/md0
resize2fs 1.43.4 (31-Jan-2017)
Dateisystem bei /dev/md0 ist auf /media/datastore eingehängt; Online-Größenänderung ist
erforderlich
old_desc_blocks = 2, new_desc_blocks = 3
Das Dateisystem auf /dev/md0 is nun 6285312 (4k) Blöcke lang.

root@host:~ #
root@host:~ # df -h /media/datastore/
Dateisystem    Größe Benutzt Verf. Verw% Eingehängt auf
/dev/md0         24G     44M   23G    1% /media/datastore
root@host:~ #
Siehe auch:
Aus einem LPI-Braindump der RedHat-Zertifizierung
Question: 27
Create a RAID Device /dev/md0 by creating equal two disks from available free space on your
harddisk and mount it on /data.
Answer and Explanation:
Redhat Enterprise Linux 4 Supports the RAID LEVEL 0, RAID LEVEL 1, RAID LEVEL 5 and
RAID LEVEL 6 at installation time. You can create it at installation time later no need to type lots
of commands for RAID.
At Installation Time:
i. Create the partitions using diskdruid.
ii. Create the Partitions having File system Type Software RAID.
iii. Click on RAID button
iv. Type the Mount Point
v. Select File system type
vi. Select RAID Level
vii. Select Partitions/disks as a member of RAID.
viii. Click on ok
After Installation: We can create the RAID Device after Installation on command-line.
1. Create the Two partitions having equal size. (Specify the Size using Cylinder, find the
remaining cylinder and divide by 2).
2. Change the Partition ID to fd (Linux raid Autodetect) by typing t.
3. Type w à To write on partitions table.
4. Use partprobe command to synchronic the partition table.
5. Use: mdadm --create /dev/md0 --level=1 --raid-devices=2 /dev/hda? /dev/hda?
6. Verify the RAID: mdadm --detail /dev/md0
7. mkfs -t ext3 /dev/md0
8. mount /dev/md0 /data
9. vi /etc/fstab
/dev/md0 /data ext3 defaults 0 0
10. Verify mounting devices using mount command.
204.2 Adjusting Storage Device Access
root@host:~ # apt-get install hdparm sdparm

root@host:~ # whatis hdparm
hdparm (8)           - get/set SATA/IDE device parameters
root@host:~ #
root@host:~ # whatis sdparm
sdparm (8)           - access SCSI modes pages; read VPD pages; send simple SCSI commands.
root@host:~ #

root@host:~ # sdparm -v /dev/sda
>>> about to open device name: /dev/sda
    /dev/sda: ATA       VBOX HARDDISK     1.0
Read write error recovery [0x1] mode page [PS=0]:
  AWRE        1  [cha: n, def:  1]
  ARRE        0  [cha: n, def:  0]
  PER         0  [cha: n, def:  0]
Caching (SBC) [0x8] mode page [PS=0]:
  WCE         1  [cha: y, def:  1]
  RCD         0  [cha: n, def:  0]
Control [0xa] mode page [PS=0]:
  SWP         0  [cha: n, def:  0]
>> Informational exceptions control mode page [0x1c] not found
root@host:~ #
root@host:~ # hdparm -v /dev/sda

/dev/sda:
multcount     = 128 (on)
IO_support    =  1 (32-bit)
readonly      =  0 (off)
readahead     = 256 (on)
geometry      = 6527/255/63, sectors = 104857600, start = 0
root@host:~ #


root@host:~ # hdparm -i /dev/sda

/dev/sda:

Model=VBOX HARDDISK, FwRev=1.0, SerialNo=VB23b08c69-abf43a85
Config={ Fixed }
RawCHS=16383/16/63, TrkSize=0, SectSize=512, ECCbytes=0
BuffType=DualPortCache, BuffSize=256kB, MaxMultSect=128, MultSect=128
CurCHS=16383/16/63, CurSects=16514064, LBA=yes, LBAsects=104857600
IORDY=yes, tPIO={min:120,w/IORDY:120}, tDMA={min:120,rec:120}
PIO modes:  pio0 pio3 pio4
DMA modes:  mdma0 mdma1 mdma2
UDMA modes: udma0 udma1 udma2 udma3 udma4 udma5 *udma6
AdvancedPM=no WriteCache=enabled
Drive conforms to: unknown:  ATA/ATAPI-1,2,3,4,5,6

* signifies the current active mode

root@host:~ #
Die Werkzeuge ‚tune2fs‘ und ‚dumpe2fs‘ im Vergleich:
root@host:~ # tune2fs -l /dev/sda1 | grep -i journal
Filesystem features:      has_journal ext_attr resize_inode dir_index filetype needs_recovery sparse_super
Journal inode:            8
Journal backup:           inode blocks
root@host:~ #
root@host:~ #
root@host:~ #
root@host:~ # dumpe2fs -h /dev/sda1 | grep -i journal
dumpe2fs 1.42.12 (29-Aug-2014)
Filesystem features:      has_journal ext_attr resize_inode dir_index filetype needs_recovery sparse_super
Journal inode:            8
Journal backup:           inode blocks
Jounaleigenschaften:         journal_incompat_revoke
Journalgröße:            4113k
Journal-Länge:            4096
Journal-Sequenz:          0x00002419
Journal-Start:            0
root@host:~ #
Einrichtung von iSCSI
Siehe dazu die folgenden Dokumente
204.3 Logical Volume Manager
Siehe:
https://knowledge.fastsimple.com/wordpress/wp-content/uploads/2014/11/NLZPM51.png
https://knowledge.fastsimple.com/wordpress/webdesktop/linux/
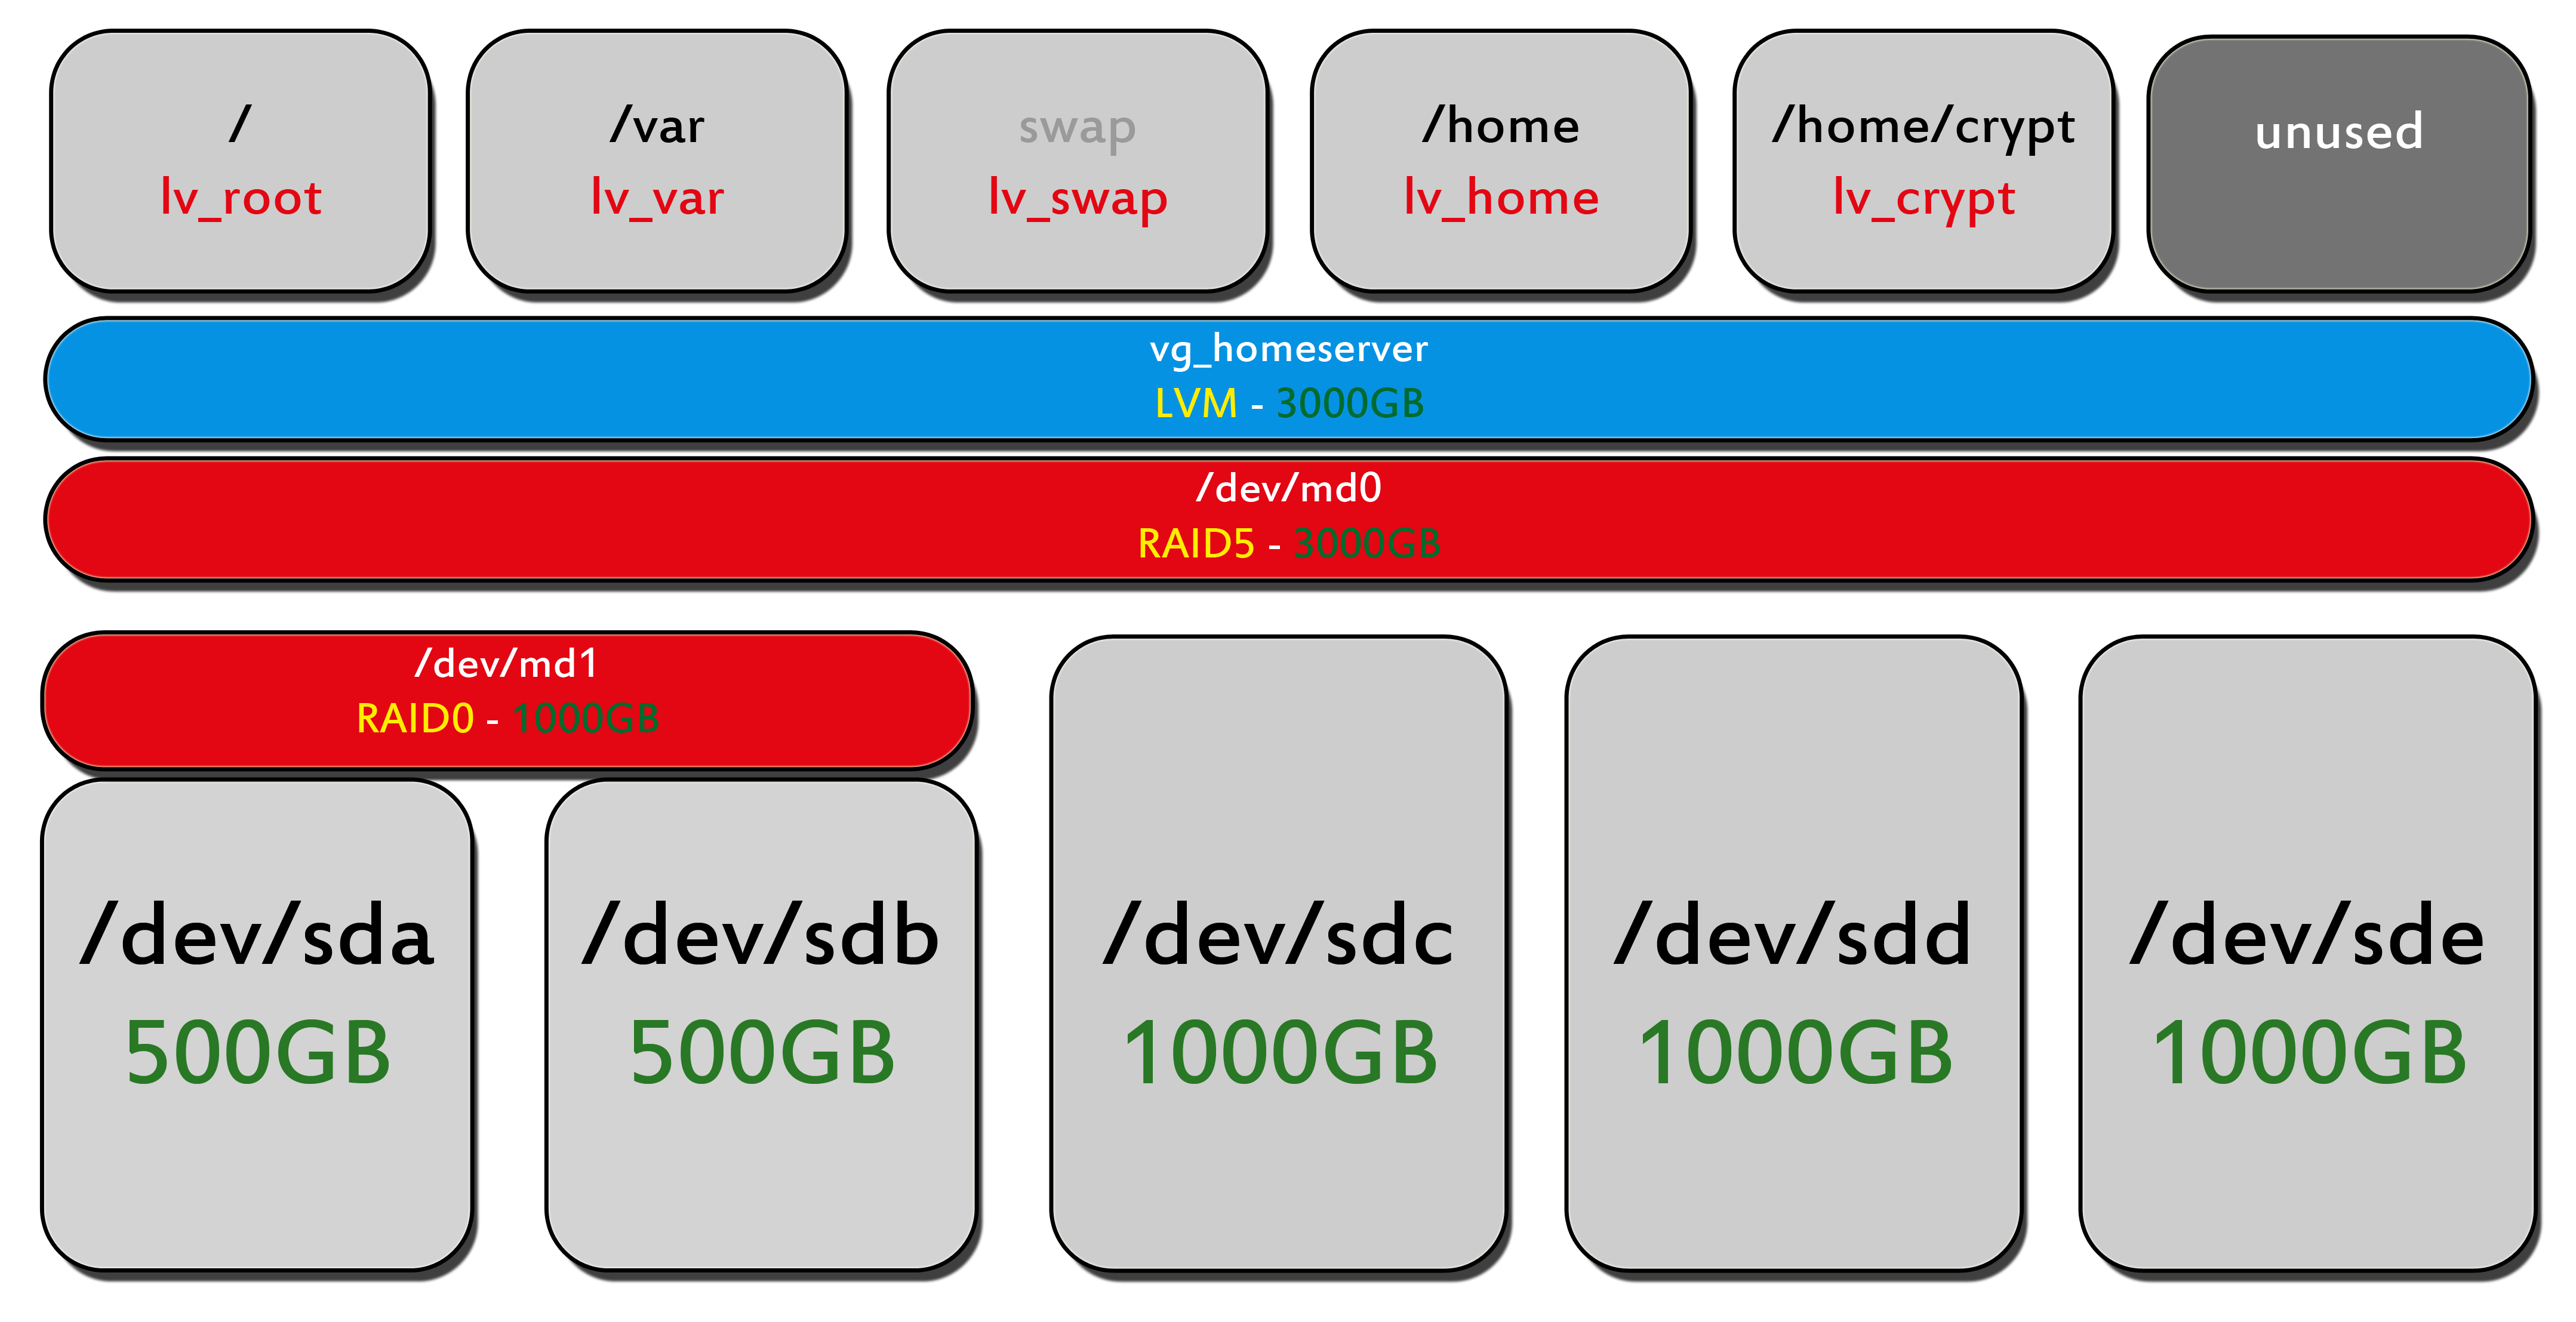
Zu den Snapshots bitte vor allem erst einmal hier nachlesen:
http://www.tldp.org/HOWTO/LVM-HOWTO/snapshots_backup.html
Man kann dazu festhalten:
Das Volume, das den Snapshot aufnimmt, benötigt u.U. nur 10 - 20% der Originalkapazität.
Der Grund: Nur wenn sich Daten im originalen Volume ändern, müssen sie im Snapshot real aufgenommen werden (nur die Differenzen).
Damit stellt ein Snapshot eine Art Puffer/Cache für den sich ändernden Datenbestand dar.
Praktische Einrichtung
root@host:~ # apt-get install lvm2
...
root@host:~ # df -h /daten/
Dateisystem    Größe Benutzt Verf. Verw% Eingehängt auf
/dev/md0         16G     54M   15G    1% /daten
root@host:~ #
root@host:~ # umount /daten
root@host:~ #
Jetzt tritt natürluch der Datenverlust ein:
root@host:~ # pvcreate /dev/md0
  Physical volume "/dev/md0" successfully created
root@host:~ #
root@host:~ # pvs
  PV         VG   Fmt  Attr PSize  PFree
  /dev/md0        lvm2 ---  15,98g 15,98g
root@host:~ #
root@host:~ #
root@host:~ # pv
pvchange   pvcreate   pvmove     pvresize   pvscan
pvck       pvdisplay  pvremove   pvs
root@host:~ # pvdisplay
  "/dev/md0" is a new physical volume of "15,98 GiB"
  --- NEW Physical volume ---
  PV Name               /dev/md0
  VG Name
  PV Size               15,98 GiB
  Allocatable           NO
  PE Size               0
  Total PE              0
  Free PE               0
  Allocated PE          0
  PV UUID               D8R2M7-8tMT-LMGV-FhpO-E2ay-knXs-kcrKax

root@host:~ #
Nun folgt das Anlegen einer Volumengroup namens ‚vg1‘:
root@host:~ # vgcreate vg1 /dev/md0
  /proc/devices: No entry for device-mapper found
  Volume group "vg1" successfully created
root@host:~ #
root@host:~ #
root@host:~ # vgs
  VG   #PV #LV #SN Attr   VSize  VFree
  vg1    1   0   0 wz--n- 15,98g 15,98g
root@host:~ #
root@host:~ # vgdisplay
  --- Volume group ---
  VG Name               vg1
  System ID
  Format                lvm2
  Metadata Areas        1
  Metadata Sequence No  1
  VG Access             read/write
  VG Status             resizable
  MAX LV                0
  Cur LV                0
  Open LV               0
  Max PV                0
  Cur PV                1
  Act PV                1
  VG Size               15,98 GiB
  PE Size               4,00 MiB
  Total PE              4091
  Alloc PE / Size       0 / 0
  Free  PE / Size       4091 / 15,98 GiB
  VG UUID               cUOsCp-Bpkr-uqFB-V8Ye-IhM2-Qjll-yLemKB

root@host:~ #
Schließlich erzeugen wir die eigentlichen Volumes:
root@host:~ # lvcreate -L 1G -n swap vg1
  Logical volume "swap" created
root@host:~ #
root@host:~ # lvcreate -L 5G -n root vg1
  Logical volume "root" created
root@host:~ #
root@host:~ # lvcreate -l 80%FREE -n home vg1
  Logical volume "home" created
root@host:~ #
root@host:~ #
root@host:~ # lvs
  LV   VG   Attr       LSize Pool Origin Data%  Meta%  Move Log Cpy%Sync Convert
  home vg1  -wi-a----- 7,98g
  root vg1  -wi-a----- 5,00g
  swap vg1  -wi-a----- 1,00g
root@host:~ #
root@host:~ # lvdisplay
  --- Logical volume ---
  LV Path                /dev/vg1/swap
  LV Name                swap
  VG Name                vg1
  LV UUID                KwKhzQ-KukM-gAvy-P16G-aK1v-qrqX-lPkomz
  LV Write Access        read/write
  LV Creation host, time gast2, 2017-01-26 09:43:15 +0100
  LV Status              available
  # open                 0
  LV Size                1,00 GiB
  Current LE             256
  Segments               1
  Allocation             inherit
  Read ahead sectors     auto
  - currently set to     4096
  Block device           253:0

  --- Logical volume ---
  LV Path                /dev/vg1/root
  LV Name                root
  VG Name                vg1
  LV UUID                Fue71U-Xt88-ICEh-ACn9-8M32-aq3t-prwi56
  LV Write Access        read/write
  LV Creation host, time gast2, 2017-01-26 09:43:56 +0100
  LV Status              available
  # open                 0
  LV Size                5,00 GiB
  Current LE             1280
  Segments               1
  Allocation             inherit
  Read ahead sectors     auto
  - currently set to     4096
  Block device           253:1

  --- Logical volume ---
  LV Path                /dev/vg1/home
  LV Name                home
  VG Name                vg1
  LV UUID                kTPcPS-E1fR-TtSp-TGGF-taqm-cs4S-Lx7Rad
  LV Write Access        read/write
  LV Creation host, time gast2, 2017-01-26 09:44:53 +0100
  LV Status              available
  # open                 0
  LV Size                7,98 GiB
  Current LE             2044
  Segments               1
  Allocation             inherit
  Read ahead sectors     auto
  - currently set to     4096
  Block device           253:2

root@host:~ #
Anfertigen von Snapshots
root@host:~ # echo 123 > /mnt/mylog
root@host:~ #
root@host:~ # df -h /mnt/
Dateisystem          Größe Benutzt Verf. Verw% Eingehängt auf
/dev/mapper/vg1-root  4,8G     47M  4,5G    2% /mnt
root@host:~ #
root@host:~ # ls -ltrc /mnt/
insgesamt 48
drwx------   2 root root 16384 Jan 26 11:01 lost+found
drwxr-xr-x 150 root root 12288 Jan 26 11:02 etc
drwxr-xr-x   2 root root  4096 Jan 26 11:02 bin
drwxr-xr-x   2 root root 12288 Jan 26 11:02 sbin
-rw-r--r--   1 root root     4 Jan 26 11:02 mylog
root@host:~ #


root@host:~ # lvcreate -L 100M -s -n rootsnap1 /dev/vg1/root
  Logical volume "rootsnap1" created
root@host:~ #
root@host:~ #
root@host:~ # mkdir /media/snap
root@host:~ #
root@host:~ # mount /dev/vg1/rootsnap1 /media/snap
root@host:~ #
root@host:~ # df -h | tail -3
/dev/md1                   8,0G    2,0G  6,0G   25% /storage
/dev/mapper/vg1-root       4,8G     47M  4,5G    2% /mnt
/dev/mapper/vg1-rootsnap1  4,8G     47M  4,5G    2% /media/snap
root@host:~ #
root@host:~ #
root@host:~ # mount | tail -3
/storage/lun1.img on /mnt type ext4 (rw,relatime,data=ordered)
/dev/mapper/vg1-root on /mnt type ext4 (rw,relatime,stripe=256,data=ordered)
/dev/mapper/vg1-rootsnap1 on /media/snap type ext4 (rw,relatime,stripe=256,data=ordered)
root@host:~ #
root@host:~ # tar czf /storage/rootfs.tar.gz /media/snap/
tar: Entferne führende „/“ von Elementnamen
tar: Entferne führende „/“ von Zielen harter Verknüpfungen
root@host:~ #
root@host:~ # ls -lh /media/snap/
insgesamt 48K
drwxr-xr-x   2 root root 4,0K Dez 21  2015 bin
drwxr-xr-x 150 root root  12K Jan 26 10:48 etc
drwx------   2 root root  16K Jan 26 11:01 lost+found
-rw-r--r--   1 root root    4 Jan 26 11:02 mylog
drwxr-xr-x   2 root root  12K Jan 26 09:36 sbin
root@host:~ #
root@host:~ # ls -lh /storage/rootfs.tar.gz
-rw-r--r-- 1 root root 13M Jan 26 11:06 /storage/rootfs.tar.gz
root@host:~ #
Wir ändern jetzt den originalen Datenbestand:
root@host:~ # echo 1234567 >> /mnt/mylog
root@host:~ #
root@host:~ # ls -ltc /media/snap/
insgesamt 48
-rw-r--r--   1 root root     4 Jan 26 11:02 mylog
drwxr-xr-x   2 root root 12288 Jan 26 11:02 sbin
drwxr-xr-x   2 root root  4096 Jan 26 11:02 bin
drwxr-xr-x 150 root root 12288 Jan 26 11:02 etc
drwx------   2 root root 16384 Jan 26 11:01 lost+found
root@host:~ #
root@host:~ # umount /media/snap
root@host:~ #
root@host:~ # mount /dev/vg1/rootsnap1 /media/snap
root@host:~ #
root@host:~ # ls -l /media/snap/mylog
-rw-r--r-- 1 root root 4 Jan 26 11:02 /media/snap/mylog
root@host:~ #
root@host:~ # umount /media/snap
Allerdings ist im Snapshot keine Änderung zu beobachten.
Snapshot löschen:
root@host:~ # umount /media/snap
root@host:~ #
root@host:~ # ls -l /mnt/mylog /media/snap/mylog
ls: Zugriff auf /media/snap/mylog nicht möglich: Datei oder Verzeichnis nicht gefunden
-rw-r--r-- 1 root root 12 Jan 26 11:09 /mnt/mylog
root@host:~ #
root@host:~ #
root@host:~ # lvremove /dev/vg1/rootsnap1
Do you really want to remove active logical volume rootsnap1? [y/n]: y
  Logical volume "rootsnap1" successfully removed
root@host:~ #
root@host:~ #
root@host:~ # ls -l /mnt/mylog
-rw-r--r-- 1 root root 12 Jan 26 11:09 /mnt/mylog
root@host:~ #
Neuen Snapshot anlegen:
root@host:~ # lvcreate -L 100M -s -n rootsnap1 /dev/vg1/root
  Logical volume "rootsnap1" created
root@host:~ #
root@host:~ # ls -l /mnt/mylog /media/snap/mylog
ls: Zugriff auf /media/snap/mylog nicht möglich: Datei oder Verzeichnis nicht gefunden
-rw-r--r-- 1 root root 12 Jan 26 11:09 /mnt/mylog
root@host:~ #
root@host:~ # mount /dev/vg1/rootsnap1 /media/snap
root@host:~ #
root@host:~ # ls -l /mnt/mylog /media/snap/mylog
-rw-r--r-- 1 root root 12 Jan 26 11:09 /media/snap/mylog
-rw-r--r-- 1 root root 12 Jan 26 11:09 /mnt/mylog
root@host:~ #
Nun soll der Snapshot zusammenführend rückgesichert werden, siehe dazu https://www.thomas-krenn.com/de/wiki/LVM_Snapshot_Merge
ACHTUNG Es kommt hier zum Fehler, da das Original-Volume nicht ausgängt und damit LVM-seitig nicht deaktiviert wurde:
root@host:~ # lvconvert --merge /dev/vg1/rootsnap1
  Logical volume vg1/root contains a filesystem in use.
  Can't merge over open origin volume.
  Merging of snapshot vg1/rootsnap1 will occur on next activation of vg1/root.
root@host:~ #
root@host:~ # lvchange -an /dev/vg1/rootsnap1
  Unable to change internal LV rootsnap1 directly
root@host:~ #
root@host:~ # lvchange -an /dev/vg1/root
  Logical volume vg1/root contains a filesystem in use.
root@host:~ #
root@host:~ #
root@host:~ #
root@host:~ # umount /mnt
root@host:~ #
root@host:~ # mount /dev/vg1/root /mnt/
root@host:~ #
root@host:~ # ls -l /mnt/
insgesamt 56
drwxr-xr-x   2 root root  4096 Dez 21  2015 bash
drwxr-xr-x   2 root root  4096 Dez 21  2015 bash-completion
drwxr-xr-x   2 root root  4096 Dez 21  2015 bin
drwxr-xr-x 150 root root 12288 Jan 26 10:48 etc
drwx------   2 root root 16384 Jan 26 11:01 lost+found
-rw-r--r--   1 root root    35 Jan 26 11:21 mylog
drwxr-xr-x   2 root root 12288 Jan 26 09:36 sbin
root@host:~ #
root@host:~ # cat /mnt/mylog
123
1234567
123456789
123456789abc
root@host:~ #
root@host:~ # ls -ltrc /dev/vg1
insgesamt 0
lrwxrwxrwx 1 root root 7 Jan 26 09:43 swap -> ../dm-0
lrwxrwxrwx 1 root root 7 Jan 26 09:44 home -> ../dm-2
lrwxrwxrwx 1 root root 7 Jan 26 11:16 root -> ../dm-1
lrwxrwxrwx 1 root root 7 Jan 26 11:16 rootsnap1 -> ../dm-3
root@host:~ #
root@host:~ # mount /dev/vg1/rootsnap1 /media/snap
root@host:~ #
root@host:~ # cat /media/snap/mylog
123
1234567
root@host:~ #
root@host:~ # ls /media/snap/
bin  etc  lost+found  mylog  sbin  test
root@host:~ #
root@host:~ # l
-su: l: Kommando nicht gefunden.
root@host:~ # ls -l
insgesamt 29992
-rw-r--r-- 4 root root    25537 Dez 23  2015 178450
drwxr-xr-x 2 root root     4096 Mär 17  2016 Bilder
-rw-r--r-- 1 root root 30585532 Feb 12  2016 boot.tgz
-rw-r--r-- 1 root root      127 Mär 21  2016 client3.conf.old
-rw-r--r-- 4 root root     4964 Dez 23  2015 crypt.hist
drwxr-xr-x 2 root root     4096 Mär 17  2016 Dokumente
drwxr-xr-x 2 root root     4096 Mär 17  2016 Downloads
drwxr-xr-x 2 root root     4096 Mär 17  2016 Musik
-rw-r--r-- 4 root root      512 Jan  5  2016 myMBR.dd
drwxr-xr-x 2 root root     4096 Mär 17  2016 Öffentlich
drwxr-xr-x 2 root root     4096 Mär 17  2016 Schreibtisch
-rw-r--r-- 1 root root    10289 Mär 23  2016 server.conf
-rw-r--r-- 1 root root       70 Mär 22  2016 server.conf.DOS
-rwxr-xr-x 1 root root      298 Feb 12  2016 shifttest
-rwxr-xr-x 4 root root     1238 Feb 11  2016 systemsnap
-rw-r--r-- 4 root root      753 Feb 11  2016 systemsnap-0.1
-rwxr-xr-x 4 root root     1272 Feb 11  2016 systemsnap-0.3
-rwxr-xr-x 4 root root     1473 Feb 11  2016 systemsnap-0.4
-rw-r--r-- 1 root root     1420 Feb 12  2016 systemsnap-cp-al.txt
-rw-r--r-- 4 root root      574 Feb 11  2016 systemsnap.testhist
drwxr-xr-x 2 root root     4096 Mär 17  2016 Videos
drwxr-xr-x 2 root root     4096 Mär 17  2016 Vorlagen
root@host:~ #
root@host:~ # tar zxf /storage/rootfs.tar.gz -C /tmp/
root@host:~ #
root@host:~ #
root@host:~ #
root@host:~ # umount /media/snap
root@host:~ #
root@host:~ # lvremove /dev/vg1/rootsnap1
  Can't remove merging snapshot logical volume "rootsnap1"
root@host:~ #
root@host:~ #
root@host:~ # ls -ltrc /dev/vg1
insgesamt 0
lrwxrwxrwx 1 root root 7 Jan 26 09:43 swap -> ../dm-0
lrwxrwxrwx 1 root root 7 Jan 26 09:44 home -> ../dm-2
lrwxrwxrwx 1 root root 7 Jan 26 11:16 root -> ../dm-1
lrwxrwxrwx 1 root root 7 Jan 26 11:16 rootsnap1 -> ../dm-3
root@host:~ #
root@host:~ #
root@host:~ # umount /mnt
root@host:~ #
root@host:~ # lvremove /dev/vg1/rootsnap1
  Can't remove merging snapshot logical volume "rootsnap1"
root@host:~ #
root@host:~ # lvremove -f /dev/vg1/rootsnap1
  Can't remove merging snapshot logical volume "rootsnap1"
root@host:~ #
root@host:~ # mount /dev/vg1/root /mnt/
root@host:~ #
root@host:~ # cat /mnt/mylog
123
1234567
123456789
123456789abc
root@host:~ #
root@host:~ # lvremove -f /dev/vg1/rootsnap1
  Can't remove merging snapshot logical volume "rootsnap1"
root@host:~ #
root@host:~ #
root@host:~ #
root@host:~ # umount /mnt
root@host:~ #
root@host:~ # df
Dateisystem    1K-Blöcke Benutzt Verfügbar Verw% Eingehängt auf
/dev/sda1       28704764 7421528  19802072   28% /
udev               10240       0     10240    0% /dev
tmpfs             172940    5204    167736    4% /run
tmpfs             432348      80    432268    1% /dev/shm
tmpfs               5120       4      5116    1% /run/lock
tmpfs             432348       0    432348    0% /sys/fs/cgroup
/dev/sda3        9481444 2206568   6770200   25% /home
/dev/sda4       12389376   13848  10255144    1% /srv/vhosts/user
tmpfs              86472       8     86464    1% /run/user/1000
/dev/md1         8370176 2093748   6276428   26% /storage
/dev/loop0       1983056    3004   1861268    1% /mnt
root@host:~ #
root@host:~ # ls -l /mnt/
insgesamt 20
drwx------ 2 root root 16384 Jan 25 11:59 lost+found
-rw-r--r-- 1 root root     4 Jan 25 13:02 myFile
root@host:~ #
root@host:~ # umount /mnt
root@host:~ # umount /mnt
umount: /mnt: nicht eingehängt
root@host:~ #
root@host:~ #
root@host:~ # lvremove /dev/vg1/rootsnap1
  Can't remove merging snapshot logical volume "rootsnap1"
root@host:~ #
root@host:~ # lvconvert --merge /dev/vg1/rootsnap1
  Snapshot rootsnap1 is already merging.
  Unable to merge LV "rootsnap1" into its origin.
root@host:~ #
root@host:~ #
root@host:~ #
root@host:~ #
root@host:~ # lvchange -an /dev/vg1/root
root@host:~ #
root@host:~ # lvchange -ay /dev/vg1/root
root@host:~ #
root@host:~ #
root@host:~ # lvconvert --merge /dev/vg1/rootsnap1
  One or more specified logical volume(s) not found.
root@host:~ #
root@host:~ #
root@host:~ # lvremove /dev/vg1/rootsnap1
  One or more specified logical volume(s) not found.
root@host:~ #
root@host:~ # ls -ltrc /dev/vg1
insgesamt 0
lrwxrwxrwx 1 root root 7 Jan 26 09:43 swap -> ../dm-0
lrwxrwxrwx 1 root root 7 Jan 26 09:44 home -> ../dm-2
lrwxrwxrwx 1 root root 7 Jan 26 11:41 root -> ../dm-4
root@host:~ #
root@host:~ #
root@host:~ # mount /dev/vg1/root /mnt/
root@host:~ #
root@host:~ # cat /mnt/mylog
123
1234567
root@host:~ #
root@host:~ # ls /mnt/
bin  etc  lost+found  mylog  sbin  test
root@host:~ #
root@host:~ #
Es lässt sich aber beaobachten, dass die Aktionen vorgemerkt wurden, selbst
das lvremove /dev/vg1/rootsnap1 lief dann im Hintergrund zu Ende.
Ein neuer Snapshot-Versuch
root@host:~ # df
Dateisystem          1K-Blöcke Benutzt Verfügbar Verw% Eingehängt auf
/dev/sda1             28704764 7421544  19802056   28% /
udev                     10240       0     10240    0% /dev
tmpfs                   172940    5192    167748    4% /run
tmpfs                   432348      80    432268    1% /dev/shm
tmpfs                     5120       4      5116    1% /run/lock
tmpfs                   432348       0    432348    0% /sys/fs/cgroup
/dev/sda3              9481444 2206568   6770200   25% /home
/dev/sda4             12389376   13848  10255144    1% /srv/vhosts/user
tmpfs                    86472       8     86464    1% /run/user/1000
/dev/md1               8370176 2093748   6276428   26% /storage
/dev/mapper/vg1-root   5029504   48112   4702864    2% /mnt
root@host:~ #
root@host:~ # umount /mnt
root@host:~ #
root@host:~ #
root@host:~ #
root@host:~ # lvcreate -L 100M -s -n rootsnap-2017-01-26 /dev/vg1/root
  Logical volume "rootsnap-2017-01-26" created
root@host:~ #
root@host:~ # mount /dev/vg1/root /mnt/
root@host:~ #
root@host:~ # echo 123 > /mnt/vor-snapshot-rücksicherung
root@host:~ #
root@host:~ # ls -l /mnt/
insgesamt 56
drwxr-xr-x   2 root root  4096 Dez 21  2015 bin
drwxr-xr-x 150 root root 12288 Jan 26 10:48 etc
drwx------   2 root root 16384 Jan 26 11:01 lost+found
-rw-r--r--   1 root root    12 Jan 26 11:09 mylog
drwxr-xr-x   2 root root 12288 Jan 26 09:36 sbin
drwxr-xr-x   2 root root  4096 Jan 26 11:21 test
-rw-r--r--   1 root root     4 Jan 26 12:51 vor-snapshot-rücksicherung
root@host:~ #
root@host:~ # umount /mnt
root@host:~ #
root@host:~ # ls -l /dev/vg1
insgesamt 0
lrwxrwxrwx 1 root root 7 Jan 26 09:44 home -> ../dm-2
lrwxrwxrwx 1 root root 7 Jan 26 12:50 root -> ../dm-4
lrwxrwxrwx 1 root root 7 Jan 26 12:50 rootsnap-2017-01-26 -> ../dm-1
lrwxrwxrwx 1 root root 7 Jan 26 09:43 swap -> ../dm-0
root@host:~ #
root@host:~ # lvconvert --merge /dev/vg1/rootsnap-2017-01-26
  Merging of volume rootsnap-2017-01-26 started.
  root: Merged: 99,9%
  root: Merged: 100,0%
  Merge of snapshot into logical volume root has finished.
  Logical volume "rootsnap-2017-01-26" successfully removed
root@host:~ #
root@host:~ #
Durch das vorherige Aushängen gelingt es problemlos und sichtbar im Vordergrund. Dabei wird zugleich der Snapshot gelöscht:
root@host:~ # ls -l /dev/vg1
insgesamt 0
lrwxrwxrwx 1 root root 7 Jan 26 09:44 home -> ../dm-2
lrwxrwxrwx 1 root root 7 Jan 26 12:53 root -> ../dm-4
lrwxrwxrwx 1 root root 7 Jan 26 09:43 swap -> ../dm-0
root@host:~ #
Wir kontrollieren den Inhalt des Volumes und müssen feststellen, dass unsere neue Datei ‚vor-snapshot-rücksicherung‘ fehlt:
root@host:~ # mount /dev/vg1/root /mnt/
root@host:~ #
root@host:~ # ls -l /mnt/
insgesamt 52
drwxr-xr-x   2 root root  4096 Dez 21  2015 bin
drwxr-xr-x 150 root root 12288 Jan 26 10:48 etc
drwx------   2 root root 16384 Jan 26 11:01 lost+found
-rw-r--r--   1 root root    12 Jan 26 11:09 mylog
drwxr-xr-x   2 root root 12288 Jan 26 09:36 sbin
drwxr-xr-x   2 root root  4096 Jan 26 11:21 test
root@host:~ #
Zusammenführen von Volume und Snapshot mittels transparenten Mountens via ‚mhddfs‘
root@host:~ # df
Dateisystem          1K-Blöcke Benutzt Verfügbar Verw% Eingehängt auf
/dev/sda1             28704764 7421844  19801756   28% /
udev                     10240       0     10240    0% /dev
tmpfs                   172940    5192    167748    4% /run
tmpfs                   432348      80    432268    1% /dev/shm
tmpfs                     5120       4      5116    1% /run/lock
tmpfs                   432348       0    432348    0% /sys/fs/cgroup
/dev/sda3              9481444 2206568   6770200   25% /home
/dev/sda4             12389376   13848  10255144    1% /srv/vhosts/user
tmpfs                    86472       8     86464    1% /run/user/1000
/dev/md1               8370176 2093748   6276428   26% /storage
/dev/mapper/vg1-root   5029504   48112   4702864    2% /mnt
root@host:~ #
root@host:~ #
root@host:~ #
root@host:~ # echo 123 > /mnt/vor-snapshot-rücksicherung
root@host:~ #
root@host:~ # ls -l /mnt/
insgesamt 56
drwxr-xr-x   2 root root  4096 Dez 21  2015 bin
drwxr-xr-x 150 root root 12288 Jan 26 10:48 etc
drwx------   2 root root 16384 Jan 26 11:01 lost+found
-rw-r--r--   1 root root    12 Jan 26 11:09 mylog
drwxr-xr-x   2 root root 12288 Jan 26 09:36 sbin
drwxr-xr-x   2 root root  4096 Jan 26 11:21 test
-rw-r--r--   1 root root     4 Jan 26 13:51 vor-snapshot-rücksicherung
root@host:~ # echo  vor-snapshot-rücksicherung >> /mnt/mylog
root@host:~ #
root@host:~ # cat /mnt/mylog
123
1234567
vor-snapshot-rücksicherung
root@host:~ #
root@host:~ # umount /mnt
root@host:~ # lvcreate -L 100M -s -n rootsnap-2017-01-26_2 /dev/vg1/root
  Logical volume "rootsnap-2017-01-26_2" created
root@host:~ #
root@host:~ #
root@host:~ # cd /media/
root@host:~ #
root@host:~ # mkdir root all
root@host:~ #
root@host:~ # ls -l
insgesamt 20
drwxr-xr-x 2 root root 4096 Jan 26 13:53 all
lrwxrwxrwx 1 root root    6 Dez 21  2015 cdrom -> cdrom0
drwxr-xr-x 2 root root 4096 Dez 21  2015 cdrom0
drwxr-xr-x 2 root root 4096 Jan 26 13:53 root
drwxr-xr-x 2 root root 4096 Jan 26 11:04 snap
drwxr-xr-x 2 root root 4096 Dez 23  2015 vhdd
root@host:~ #
root@host:~ # df -h
Dateisystem    Größe Benutzt Verf. Verw% Eingehängt auf
/dev/sda1        28G    7,1G   19G   28% /
udev             10M       0   10M    0% /dev
tmpfs           169M    5,1M  164M    4% /run
tmpfs           423M     80K  423M    1% /dev/shm
tmpfs           5,0M    4,0K  5,0M    1% /run/lock
tmpfs           423M       0  423M    0% /sys/fs/cgroup
/dev/sda3       9,1G    2,2G  6,5G   25% /home
/dev/sda4        12G     14M  9,8G    1% /srv/vhosts/user
tmpfs            85M    8,0K   85M    1% /run/user/1000
/dev/md1        8,0G    2,0G  6,0G   26% /storage
root@host:~ #
root@host:~ # mount /dev/vg1/root /mnt/
root@host:~ # mount /dev/vg1/rootsnap-2017-01-26_2 /media/snap
root@host:~ # apt-get install mhddfs
...
root@host:~ # mhddfs /mnt/ /media/snap/ /media/all/
mhddfs: directory '/mnt/' added to list
mhddfs: directory '/media/snap/' added to list
mhddfs: mount to: /media/all/
mhddfs: move size limit 4294967296 bytes
root@host:~ #
root@host:~ # ls -l /media/all/
insgesamt 56
drwxr-xr-x   2 root root  4096 Dez 21  2015 bin
drwxr-xr-x 150 root root 12288 Jan 26 10:48 etc
drwx------   2 root root 16384 Jan 26 11:01 lost+found
-rw-r--r--   1 root root    40 Jan 26 13:52 mylog
drwxr-xr-x   2 root root 12288 Jan 26 09:36 sbin
drwxr-xr-x   2 root root  4096 Jan 26 11:21 test
-rw-r--r--   1 root root     4 Jan 26 13:51 vor-snapshot-rücksicherung
root@host:~ #
root@host:~ # cat /media/all/mylog
123
1234567
vor-snapshot-rücksicherung
root@host:~ #
root@host:~ # cat /mnt/mylog
123
1234567
vor-snapshot-rücksicherung
root@host:~ #
root@host:~ #
root@host:~ #
root@host:~ # echo  vor-snapshot-rücksicherung Nr. 2 >> /mnt/mylog
root@host:~ #
root@host:~ # cat /mnt/mylog
123
vor-snapshot-rücksicherung
vor-snapshot-rücksicherung Nr. 2
root@host:~ #
root@host:~ # cat /media/all/mylog
123
1234567
vor-snapshot-rücksicherung
vor-snapshot-rücksicherung Nr. 2
root@host:~ #
root@host:~ # cat /media/snap/mylog
123
1234567
vor-snapshot-rücksicherung
root@host:~ #
Vertiefung mount-Optionen
Als root erstellen wir ein Dateisystem-Image und mounten es, ohne eine bestimmte ‚uid‘ anzugeben:
root@d8:~# truncate -s 512M vfat.img
root@d8:~#
root@d8:~# file vfat.img
vfat.img: data
root@d8:~#
root@d8:~#
root@d8:~# mkdosfs -F32 vfat.img
mkfs.fat 3.0.27 (2014-11-12)
root@d8:~#
root@d8:~# file vfat.img
vfat.img: DOS/MBR boot sector, code offset 0x58+2, OEM-ID "mkfs.fat", sectors/cluster 8, Media descriptor 0xf8, sectors/track 32, heads 64, sectors 1048576 (volumes > 32 MB) , FAT (32 bit), sectors/FAT 1022, serial number 0xf5a8dbaf, unlabeled
root@d8:~#
root@d8:~#
root@d8:~# mount vfat.img /mnt/
root@d8:~#
root@d8:~# echo 123 > /mnt/datei
root@d8:~#
Diese Ressource kann ein einfacher Benutzer nicht beschreiben:
tux@d8:~$ cat /mnt/datei
123
tux@d8:~$
tux@d8:~$ echo Zeile2 > /mnt/datei2
bash: /mnt/datei2: Keine Berechtigung
tux@d8:~$
Mountet es der Admin aber mit den Optionen ‚uid=tux,gid=tux‘ gelingt das Ganze:
root@d8:~# umount /mnt
root@d8:~#
root@d8:~# mount vfat.img /mnt -o uid=tux,gid=tux
root@d8:~#
root@d8:~# mount | tail -2
binfmt_misc on /proc/sys/fs/binfmt_misc type binfmt_misc (rw,relatime)
/root/vfat.img on /mnt type vfat (rw,relatime,uid=1000,gid=1000,fmask=0022,dmask=0022,codepage=437,iocharset=utf8,shortname=mixed,errors=remount-ro)
root@d8:~# exit
tux@jessie:~$ echo Zeile2 >> /mnt/datei
tux@d8:~$ cat /mnt/datei
123
Zeile2
tux@d8:~$
THEMA: Troubleshooting Soft-RAID
Wo ist das zweite RAID ‚/dev/md1‘ geblieben?
Es wurde nach dem Neustart nicht mit aktiviert, weil wir am Vortag vergessen hatten, es mit in die ‚mdadm.conf‘ aufzunehmen.
root@host:~ # mdadm --examine /dev/sdf
/dev/sdf:
      Magic : a92b4efc
  Version : 1.2
    Feature Map : 0x0
    Array UUID : 90c0d252:3a6341c3:2d619708:3ce1bf1e
      Name : gast2:1  (local to host gast2)
  Creation Time : Tue Jan 24 12:59:55 2017
    Raid Level : raid1
  Raid Devices : 2

Avail Dev Size : 16760832 (7.99 GiB 8.58 GB)
    Array Size : 8380416 (7.99 GiB 8.58 GB)
    Data Offset : 16384 sectors
  Super Offset : 8 sectors
  Unused Space : before=16296 sectors, after=0 sectors
      State : clean
    Device UUID : 14c89af3:09e33f8a:6b25193c:5a09fb9f

    Update Time : Thu Jan 26 11:39:28 2017
  Bad Block Log : 512 entries available at offset 72 sectors
  Checksum : 6804ff02 - correct
  Events : 33


  Device Role : Active device 0
  Array State : AA ('A' == active, '.' == missing, 'R' == replacing)
root@host:~ #


root@host:~ # mdadm --examine /dev/sda
/dev/sda:
  MBR Magic : aa55
Partition[0] :     58591232 sectors at         2048 (type 83)
Partition[1] :      1953792 sectors at     58593280 (type 82)
Partition[2] :     19531776 sectors at     60547072 (type 83)
Partition[3] :     24778752 sectors at     80078848 (type 83)
root@host:~ #


root@host:~ # grep -v ^# /etc/mdadm/mdadm.conf


  CREATE owner=root group=disk mode=0660 auto=yes
  HOMEHOST <system>
  MAILADDR root
  ARRAY /dev/md0 metadata=1.2 name=gast2:0 UUID=db97df8f:ed2c3608:10551277:de3767aa
Reparatur
Eigentlich wird es problemlos gefunden und wir müssten nur die zweite Zeile mit in die Datei aufnehmen, aber wir wollen noch ein wenig experimentieren. Vor allem der Frage nachgehen, ob ein Assembling automatisch funktionieren würde.
root@host:~ # mdadm --detail --scan
ARRAY /dev/md/1 metadata=1.2 name=gast2:1 UUID=90c0d252:3a6341c3:2d619708:3ce1bf1e
ARRAY /dev/md/0 metadata=1.2 name=gast2:0 UUID=db97df8f:ed2c3608:10551277:de3767aa
root@host:~ #
root@host:~ # lsblk
NAME                                 MAJ:MIN RM  SIZE RO TYPE  MOUNTPOINT
sda                                    8:0    0   50G  0 disk
├─sda1                                 8:1    0   28G  0 part  /
├─sda2                                 8:2    0  954M  0 part  [SWAP]
├─sda3                                 8:3    0  9,3G  0 part  /home
└─sda4                                 8:4    0 11,8G  0 part  /srv/vhosts/user
sdb                                    8:16   0    8G  0 disk
└─md0                                  9:0    0   16G  0 raid5
├─vg1-swap                         253:0    0    1G  0 lvm
├─vg1-root-real                    253:1    0    5G  0 lvm
│ ├─vg1-root                       253:2    0    5G  0 lvm
│ └─vg1-rootsnap--2017--01--26_2   253:4    0    5G  0 lvm
├─vg1-rootsnap--2017--01--26_2-cow 253:3    0  100M  0 lvm
│ └─vg1-rootsnap--2017--01--26_2   253:4    0    5G  0 lvm
└─vg1-home                         253:5    0    8G  0 lvm
sdc                                    8:32   0    8G  0 disk
└─md0                                  9:0    0   16G  0 raid5
├─vg1-swap                         253:0    0    1G  0 lvm
├─vg1-root-real                    253:1    0    5G  0 lvm
│ ├─vg1-root                       253:2    0    5G  0 lvm
│ └─vg1-rootsnap--2017--01--26_2   253:4    0    5G  0 lvm
├─vg1-rootsnap--2017--01--26_2-cow 253:3    0  100M  0 lvm
│ └─vg1-rootsnap--2017--01--26_2   253:4    0    5G  0 lvm
└─vg1-home                         253:5    0    8G  0 lvm
sdd                                    8:48   0    8G  0 disk
└─md0                                  9:0    0   16G  0 raid5
├─vg1-swap                         253:0    0    1G  0 lvm
├─vg1-root-real                    253:1    0    5G  0 lvm
│ ├─vg1-root                       253:2    0    5G  0 lvm
│ └─vg1-rootsnap--2017--01--26_2   253:4    0    5G  0 lvm
├─vg1-rootsnap--2017--01--26_2-cow 253:3    0  100M  0 lvm
│ └─vg1-rootsnap--2017--01--26_2   253:4    0    5G  0 lvm
└─vg1-home                         253:5    0    8G  0 lvm
sde                                    8:64   0    8G  0 disk
sdf                                    8:80   0    8G  0 disk
sr0                                   11:0    1 1024M  0 rom
root@host:~ #
root@host:~ #
root@host:~ # mdadm -A /dev/md/1 /dev/sd[e-f]
mdadm: /dev/md/1 has been started with 2 drives.
root@host:~ #
root@host:~ # cat /proc/mdstat
Personalities : [raid6] [raid5] [raid4] [raid1]
md1 : active (auto-read-only) raid1 sdf[2] sde[1]
8380416 blocks super 1.2 [2/2] [UU]

md0 : active raid5 sdb[0] sdd[3] sdc[4]
16760832 blocks super 1.2 level 5, 512k chunk, algorithm 2 [3/3] [UUU]

unused devices: <none>
root@host:~ #
root@host:~ # mount /dev/mapper/
control                           vg1-root                          vg1-rootsnap--2017--01--26_2      vg1-swap
vg1-home                          vg1-root-real                     vg1-rootsnap--2017--01--26_2-cow
root@host:~ # ls -l /dev/md
insgesamt 0
lrwxrwxrwx 1 root root 6 Jan 27 10:02 1 -> ../md1
root@host:~ #
root@host:~ # file  /dev/md1
/dev/md1: block special (9/1)
root@host:~ #
root@host:~ # mount /dev/md1 /mnt/
root@host:~ #
root@host:~ # ls -l /mnt/
insgesamt 2060816
-rw-r--r-- 1 root root 2097152000 Jan 26 11:37 lun1.img
-rw-r--r-- 1 root root   13122315 Jan 26 11:06 rootfs.tar.gz
root@host:~ #
root@host:~ #
Neuer Versuch:
root@host:~ # cat /proc/mdstat
Personalities : [raid6] [raid5] [raid4]
md0 : active (auto-read-only) raid5 sdb[0] sdd[3] sdc[4]
  16760832 blocks super 1.2 level 5, 512k chunk, algorithm 2 [3/3] [UUU]

unused devices: <none>
root@host:~ #
root@host:~ # mdadm --assemble --scan
root@host:~ #
root@host:~ # cat /proc/mdstat
Personalities : [raid6] [raid5] [raid4]
md0 : active (auto-read-only) raid5 sdb[0] sdd[3] sdc[4]
  16760832 blocks super 1.2 level 5, 512k chunk, algorithm 2 [3/3] [UUU]

unused devices: <none>
root@host:~ #

Warum wird hier nichts automatisch gefunden, liegt es evl am nicht am nicht gesetzten Partitionstyp 'fd' (Linux raid autodetect)??

root@host:~ #
root@host:~ # lsblk | tail -5
  │ └─vg1-rootsnap--2017--01--26_2   253:4    0    5G  0 lvm
  └─vg1-home                         253:5    0    8G  0 lvm
sde                                    8:64   0    8G  0 disk
sdf                                    8:80   0    8G  0 disk
sr0                                   11:0    1 1024M  0 rom
root@host:~ #
Dann eben per Hand:
root@host:~ # mdadm --assemble /dev/md1 /dev/sde /dev/sdf
mdadm: /dev/md1 has been started with 2 drives.
root@host:~ #
root@host:~ #
root@host:~ # lsblk | tail -5
sde                                    8:64   0    8G  0 disk
└─md1                                  9:1    0    8G  0 raid1
sdf                                    8:80   0    8G  0 disk
└─md1                                  9:1    0    8G  0 raid1
sr0                                   11:0    1 1024M  0 rom
root@host:~ #
root@host:~ # lsblk | less
root@host:~ #
root@host:~ # cat /proc/mdstat
Personalities : [raid6] [raid5] [raid4] [raid1]
md1 : active (auto-read-only) raid1 sdf[2] sde[1]
  8380416 blocks super 1.2 [2/2] [UU]

md0 : active (auto-read-only) raid5 sdb[0] sdd[3] sdc[4]
  16760832 blocks super 1.2 level 5, 512k chunk, algorithm 2 [3/3] [UUU]

unused devices: <none>
root@host:~ #


root@host:~ # mdadm --stop /dev/md1
mdadm: stopped /dev/md1
root@host:~ #
root@host:~ # cat /proc/mdstat
Personalities : [raid6] [raid5] [raid4] [raid1]
md0 : active (auto-read-only) raid5 sdb[0] sdd[3] sdc[4]
  16760832 blocks super 1.2 level 5, 512k chunk, algorithm 2 [3/3] [UUU]

unused devices: <none>
root@host:~ #
root@host:~ #
root@host:~ #
root@host:~ # fdisk /dev/sde

Willkommen bei fdisk (util-linux 2.25.2).
Änderungen werden vorerst nur im Speicher vorgenommen, bis Sie sich
entscheiden, sie zu schreiben.
Seien Sie vorsichtig, bevor Sie den Schreibbefehl anwenden.

/dev/sde: Gerät enthält eine gültige »linux_raid_member«-Signature, es wird dringend empfohlen, das Gerät mit dem Befehl wipefs(8) zu leeren, falls diese Konfiguration ungewöhnlich ist, um mögliche Kollisionen zu vermeiden.

Gerät enthält keine erkennbare Partitionstabelle.
Created a new DOS disklabel with disk identifier 0x1fbaa1ea.

Befehl (m für Hilfe): ### Keine Change, die Partition-ID zu setzen!
#: unbekannter Befehl

Befehl (m für Hilfe): ^C
root@host:~ #
Vielleicht liegt es daran, dass die Minor-Devices - d.h. die Partitionen fehlen, so dass wir ja auch schließlich nicht den Partitionstyp 0xFD setzen können.
Zu den Device-Bezeichnern im Dateisystem (ls -l /dev/sd*) siehe http://tldp.org/HOWTO/Partition/devices.html
root@host:~ # wipefs -af /dev/sde
/dev/sde: 4 Bytes wurden an Position 0x00001000 gelöscht (linux_raid_member): fc 4e 2b a9
root@host:~ #
root@host:~ # wipefs -af /dev/sdf
/dev/sdf: 4 Bytes wurden an Position 0x00001000 gelöscht (linux_raid_member): fc 4e 2b a9
root@host:~ #
root@host:~ # cat /proc/mdstat
Personalities : [raid6] [raid5] [raid4] [raid1]
md1 : active (auto-read-only) raid1 sdf[2] sde[1]
 8380416 blocks super 1.2 [2/2] [UU]

md0 : active (auto-read-only) raid5 sdb[0] sdd[3] sdc[4]
  16760832 blocks super 1.2 level 5, 512k chunk, algorithm 2 [3/3] [UUU]

unused devices: <none>
root@host:~ # mdadm --stop /dev/md1
mdadm: stopped /dev/md1
root@host:~ #
root@host:~ # mdadm --assemble /dev/md1 /dev/sde /dev/sdf
mdadm: no recogniseable superblock on /dev/sde
mdadm: /dev/sde has no superblock - assembly aborted
root@host:~ #

root@host:~ # fdisk /dev/sde

Willkommen bei fdisk (util-linux 2.25.2).
Änderungen werden vorerst nur im Speicher vorgenommen, bis Sie sich
entscheiden, sie zu schreiben.
Seien Sie vorsichtig, bevor Sie den Schreibbefehl anwenden.

Gerät enthält keine erkennbare Partitionstabelle.
Created a new DOS disklabel with disk identifier 0x09957e2a.

Befehl (m für Hilfe): n
Partitionstyp
  p   Primär (0 primär, 0 erweitert, 4 frei)
  e   Erweitert (Container für logische Partitionen)
Wählen (Vorgabe p):

Standardantwort p wird verwendet.
Partitionsnummer (1-4, Vorgabe 1):
Erster Sektor (2048-16777215, Vorgabe 2048):
Letzter Sektor, +Sektoren oder +Größe{K,M,G,T,P} (2048-16777215, Vorgabe 16777215):

Eine neue Partition 1 des Typs »Linux« und der Größe 8 GiB wurde erstellt.

Befehl (m für Hilfe): t
Partition 1 ausgewählt
Hexadezimalcode (geben Sie L ein, um alle Codes aufzulisten): fd
Partitionstyp von »Linux« nach »Linux raid autodetect« geändert.

Befehl (m für Hilfe): p
Festplatte /dev/sde: 8 GiB, 8589934592 Bytes, 16777216 Sektoren
Einheiten: Sektoren von 1 * 512 = 512 Bytes
Sektorgröße (logisch/physikalisch): 512 Bytes / 512 Bytes
E/A-Größe (minimal/optimal): 512 Bytes / 512 Bytes
Festplattenbezeichnungstyp: dos
Festplattenbezeichner: 0x09957e2a

Device     Boot Start      End  Sectors Size Id Type
/dev/sde1        2048 16777215 16775168   8G fd Linux raid autodetect


Befehl (m für Hilfe): w
Die Partitionstabelle wurde verändert.
ioctl() wird aufgerufen, um die Partitionstabelle neu einzulesen.
Festplatten werden synchronisiert.

root@host:~ #


root@host:~ # ls -ltrc /dev/sd*
brw-rw---- 1 root disk 8,  0 Jan 27 10:06 /dev/sda
brw-rw---- 1 root disk 8, 16 Jan 27 10:06 /dev/sdb
brw-rw---- 1 root disk 8, 32 Jan 27 10:06 /dev/sdc
brw-rw---- 1 root disk 8, 48 Jan 27 10:06 /dev/sdd
brw-rw---- 1 root disk 8,  1 Jan 27 10:07 /dev/sda1
brw-rw---- 1 root disk 8,  2 Jan 27 10:07 /dev/sda2
brw-rw---- 1 root disk 8,  4 Jan 27 10:07 /dev/sda4
brw-rw---- 1 root disk 8,  3 Jan 27 10:07 /dev/sda3
brw-rw---- 1 root disk 8, 64 Jan 27 11:38 /dev/sde
brw-rw---- 1 root disk 8, 65 Jan 27 11:38 /dev/sde1
brw-rw---- 1 root disk 8, 80 Jan 27 11:46 /dev/sdf
brw-rw---- 1 root disk 8, 81 Jan 27 11:46 /dev/sdf1
root@host:~ #
root@host:~ # du /dev/sd*
0     /dev/sda
0     /dev/sda1
0     /dev/sda2
0     /dev/sda3
0     /dev/sda4
0     /dev/sdb
0     /dev/sdc
0     /dev/sdd
0     /dev/sde
0     /dev/sde1
0     /dev/sdf
0     /dev/sdf1
root@host:~ #
Das zweite RAID mit Partitionen vom Type 0xFD neu anlegen
Zur Erinnerung - bei manueller Aktivierung des RAIDs fürs Booten muss das Ergebnis der folgenden Kommandozeile an die Datei /etc/mdadm/mdadm.conf angehängt werden:
root@host:~ # mdadm --detail --scan /dev/md1
ARRAY /dev/md1 metadata=1.2 name=gast2:1 UUID=aea577e5:057a49f7:998486aa:d826a6e5
root@host:~ #
Zum Erforschen der UUID-Problematik:
root@host:~ # tune2fs -U `uuidgen` /dev/sde
tune2fs 1.42.12 (29-Aug-2014)
tune2fs: Ungültige magische Zahl im Superblock beim Versuch, /dev/sde zu öffnen
Es kann kein gültiger Dateisystem-Superblock gefunden werden.
root@host:~ #
root@host:~ #
root@host:~ # wipefs -af /dev/sde
/dev/sde: 2 Bytes wurden an Position 0x000001fe gelöscht (dos): 55 aa
root@host:~ # wipefs -af /dev/sdf
/dev/sdf: 2 Bytes wurden an Position 0x000001fe gelöscht (dos): 55 aa
root@host:~ #
root@host:~ #
root@host:~ # tune2fs -U `uuidgen` /dev/sde
tune2fs 1.42.12 (29-Aug-2014)
tune2fs: Ungültige magische Zahl im Superblock beim Versuch, /dev/sde zu öffnen
Es kann kein gültiger Dateisystem-Superblock gefunden werden.
root@host:~ #
root@host:~ #
root@host:~ # tune2fs -U `uuidgen` /dev/sde1
tune2fs 1.42.12 (29-Aug-2014)
tune2fs: Datei oder Verzeichnis nicht gefunden beim Versuch, /dev/sde1 zu öffnen
Es kann kein gültiger Dateisystem-Superblock gefunden werden.
root@host:~ #
root@host:~ # mkfs /dev/sde1
mke2fs 1.42.12 (29-Aug-2014)
The file /dev/sde1 does not exist and no size was specified.
root@host:~ #
root@host:~ #
root@host:~ # fdisk  /dev/sde

Willkommen bei fdisk (util-linux 2.25.2).
Änderungen werden vorerst nur im Speicher vorgenommen, bis Sie sich
entscheiden, sie zu schreiben.
Seien Sie vorsichtig, bevor Sie den Schreibbefehl anwenden.

Gerät enthält keine erkennbare Partitionstabelle.
Created a new DOS disklabel with disk identifier 0xc01be7eb.

Befehl (m für Hilfe): n
Partitionstyp
  p   Primär (0 primär, 0 erweitert, 4 frei)
  e   Erweitert (Container für logische Partitionen)
Wählen (Vorgabe p):

Standardantwort p wird verwendet.
Partitionsnummer (1-4, Vorgabe 1):
Erster Sektor (2048-16777215, Vorgabe 2048):
Letzter Sektor, +Sektoren oder +Größe{K,M,G,T,P} (2048-16777215, Vorgabe 16777215):

Eine neue Partition 1 des Typs »Linux« und der Größe 8 GiB wurde erstellt.

Befehl (m für Hilfe): w
Die Partitionstabelle wurde verändert.
ioctl() wird aufgerufen, um die Partitionstabelle neu einzulesen.
Festplatten werden synchronisiert.

root@host:~ #
root@host:~ # mkfs /dev/sde1
mke2fs 1.42.12 (29-Aug-2014)
/dev/sde1 hat ein linux_raid_member-Dateisystem mit Namen „gast2:1“
Trotzdem fortfahren? (j,n) j
Ein Dateisystems mit 2096896 (4k) Blöcken und 524288 Inodes wird erzeugt.
UUID des Dateisystems: f8193d70-5194-4d58-aa4c-f1af95a2a65a
Superblock-Sicherungskopien gespeichert in den Blöcken:
  32768, 98304, 163840, 229376, 294912, 819200, 884736, 1605632

beim Anfordern von Speicher für die Gruppentabellen: erledigt
Inode-Tabellen werden geschrieben: erledigt
Die Superblöcke und die Informationen über die Dateisystemnutzung werden
geschrieben:
erledigt

root@host:~ #
root@host:~ # blkid /dev/sde1
/dev/sde1: UUID="f8193d70-5194-4d58-aa4c-f1af95a2a65a" TYPE="ext2" PARTUUID="c01be7eb-01"
root@host:~ #
root@host:~ # tune2fs -U `uuidgen` /dev/sde1
tune2fs 1.42.12 (29-Aug-2014)
root@host:~ #
root@host:~ # blkid /dev/sde1
/dev/sde1: UUID="3167bae5-80df-4e36-8d32-1bdec5d5e0c9" TYPE="ext2" PARTUUID="c01be7eb-01"
root@host:~ #
Dieser Versuch offenbart, dass das Assembeln nur mit einer gültigen ‚mdadm.conf‘ oder mittels der Angabe von ‚–uuid=…‘ gelingt:
root@host:~ # mdadm --assemble /dev/md1 /dev/sde1 /dev/sdf1
mdadm: /dev/md1 has been started with 2 drives.
root@host:~ #
root@host:~ # cat /proc/mdstat
Personalities : [raid6] [raid5] [raid4] [raid1]
md1 : active (auto-read-only) raid1 sde1[0] sdf1[1]
  8383488 blocks super 1.2 [2/2] [UU]

md0 : active (auto-read-only) raid5 sdb[0] sdd[3] sdc[4]
  16760832 blocks super 1.2 level 5, 512k chunk, algorithm 2 [3/3] [UUU]

unused devices: <none>
root@host:~ #
root@host:~ # mdadm --detail --scan /dev/md1
ARRAY /dev/md1 metadata=1.2 name=gast2:1 UUID=f7d185ac:dd3eb404:bbd7f658:6a22db35
root@host:~ #
root@host:~ # mdadm --detail --scan /dev/md1 >> /etc/mdadm/mdadm.conf
root@host:~ #
root@host:~ # tail -3 /etc/mdadm/mdadm.conf
# This configuration was auto-generated on Tue, 24 Jan 2017 09:07:23 +0100 by mkconf
ARRAY /dev/md0 metadata=1.2 name=gast2:0 UUID=db97df8f:ed2c3608:10551277:de3767aa
ARRAY /dev/md1 metadata=1.2 name=gast2:1 UUID=f7d185ac:dd3eb404:bbd7f658:6a22db35
root@host:~ #
root@host:~ # mdadm --stop /dev/md1
mdadm: stopped /dev/md1
root@host:~ #
root@host:~ # mdadm --assemble --verbose --scan
mdadm: looking for devices for /dev/md0
mdadm: no RAID superblock on /dev/dm-5
mdadm: no RAID superblock on /dev/dm-4
mdadm: no RAID superblock on /dev/dm-3
mdadm: no RAID superblock on /dev/dm-2
mdadm: no RAID superblock on /dev/dm-1
mdadm: no RAID superblock on /dev/dm-0
mdadm: no RAID superblock on /dev/md0
mdadm: cannot open device /dev/sr0: No medium found
mdadm: /dev/sde1 has wrong uuid.
mdadm: no RAID superblock on /dev/sde
mdadm: /dev/sdb is busy - skipping
mdadm: /dev/sdd is busy - skipping
mdadm: no RAID superblock on /dev/sda4
mdadm: no RAID superblock on /dev/sda3
mdadm: no RAID superblock on /dev/sda2
mdadm: no RAID superblock on /dev/sda1
mdadm: no RAID superblock on /dev/sda
mdadm: /dev/sdf1 has wrong uuid.
mdadm: no RAID superblock on /dev/sdf
mdadm: /dev/sdc is busy - skipping
mdadm: looking for devices for /dev/md1
mdadm: no RAID superblock on /dev/dm-5
mdadm: no RAID superblock on /dev/dm-4
mdadm: no RAID superblock on /dev/dm-3
mdadm: no RAID superblock on /dev/dm-2
mdadm: no RAID superblock on /dev/dm-1
mdadm: no RAID superblock on /dev/dm-0
mdadm: no RAID superblock on /dev/md0
mdadm: cannot open device /dev/sr0: No medium found
mdadm: no RAID superblock on /dev/sde
mdadm: /dev/sdb has wrong uuid.
mdadm: /dev/sdd has wrong uuid.
mdadm: no RAID superblock on /dev/sda4
mdadm: no RAID superblock on /dev/sda3
mdadm: no RAID superblock on /dev/sda2
mdadm: no RAID superblock on /dev/sda1
mdadm: no RAID superblock on /dev/sda
mdadm: no RAID superblock on /dev/sdf
mdadm: /dev/sdc has wrong uuid.
mdadm: /dev/sde1 is identified as a member of /dev/md1, slot 0.
mdadm: /dev/sdf1 is identified as a member of /dev/md1, slot 1.
mdadm: added /dev/sdf1 to /dev/md1 as 1
mdadm: added /dev/sde1 to /dev/md1 as 0
mdadm: /dev/md1 has been started with 2 drives.
mdadm: looking for devices for /dev/md0
mdadm: no RAID superblock on /dev/md1
mdadm: no RAID superblock on /dev/dm-5
mdadm: no RAID superblock on /dev/dm-4
mdadm: no RAID superblock on /dev/dm-3
mdadm: no RAID superblock on /dev/dm-2
mdadm: no RAID superblock on /dev/dm-1
mdadm: no RAID superblock on /dev/dm-0
mdadm: no RAID superblock on /dev/md0
mdadm: cannot open device /dev/sr0: No medium found
mdadm: /dev/sde1 has wrong uuid.
mdadm: no RAID superblock on /dev/sde
mdadm: /dev/sdb is busy - skipping
mdadm: /dev/sdd is busy - skipping
mdadm: no RAID superblock on /dev/sda4
mdadm: no RAID superblock on /dev/sda3
mdadm: no RAID superblock on /dev/sda2
mdadm: no RAID superblock on /dev/sda1
mdadm: no RAID superblock on /dev/sda
mdadm: /dev/sdf1 has wrong uuid.
mdadm: no RAID superblock on /dev/sdf
mdadm: /dev/sdc is busy - skipping
root@host:~ #
root@host:~ #
root@host:~ # cat /proc/mdstat
Personalities : [raid6] [raid5] [raid4] [raid1]
md1 : active (auto-read-only) raid1 sde1[0] sdf1[1]
  8383488 blocks super 1.2 [2/2] [UU]

md0 : active (auto-read-only) raid5 sdb[0] sdd[3] sdc[4]
  16760832 blocks super 1.2 level 5, 512k chunk, algorithm 2 [3/3] [UUU]

unused devices: <none>
root@host:~ #
root@host:~ # mdadm --stop /dev/md1
mdadm: stopped /dev/md1
root@host:~ #
root@host:~ #
root@host:~ # mdadm --assemble --verbose --uuid=f7d185ac:dd3eb404:bbd7f658:6a22db35  /dev/md1
mdadm: looking for devices for /dev/md1
mdadm: no recogniseable superblock on /dev/dm-5
mdadm: no recogniseable superblock on /dev/dm-4
mdadm: no recogniseable superblock on /dev/dm-3
mdadm: no recogniseable superblock on /dev/dm-2
mdadm: no recogniseable superblock on /dev/dm-1
mdadm: no recogniseable superblock on /dev/dm-0
mdadm: no recogniseable superblock on /dev/md0
mdadm: cannot open device /dev/sr0: No medium found
mdadm: no RAID superblock on /dev/sde
mdadm: /dev/sdb has wrong uuid.
mdadm: /dev/sdd has wrong uuid.
mdadm: no RAID superblock on /dev/sda4
mdadm: no RAID superblock on /dev/sda3
mdadm: no RAID superblock on /dev/sda2
mdadm: no RAID superblock on /dev/sda1
mdadm: no RAID superblock on /dev/sda
mdadm: no RAID superblock on /dev/sdf
mdadm: /dev/sdc has wrong uuid.
mdadm: /dev/sde1 is identified as a member of /dev/md1, slot 0.
mdadm: /dev/sdf1 is identified as a member of /dev/md1, slot 1.
mdadm: added /dev/sdf1 to /dev/md1 as 1
mdadm: added /dev/sde1 to /dev/md1 as 0
mdadm: /dev/md1 has been started with 2 drives.
root@host:~ #
Linktipp für das praktische Wegsichern von LVM-Snapshots für Backupzwecke: http://backdrift.org/xen-backup-simple-backups-with-lvm-and-rsnapshot
Zur Syntax der Konfiurationsdatei:
Nur Tabulatorschritte als Trenner verwenden (keine Leerzeichen)
Verzeichnisangaben müssen mit einem Slash enden
Beispieldatei ‚/etc/rsnapshot.conf‘:
config_version        1.2

### Ziel-Speicherort für die Backups
snapshot_root /home/rsnapshot/

cmd_cp                /bin/cp
cmd_rm                /bin/rm
cmd_rsync     /usr/bin/rsync
cmd_logger    /usr/bin/logger

### Rotation der Backups
retain        daily   7
retain        weekly  4

verbose               2
loglevel      3
lockfile      /var/run/rsnapshot.pid

### Was gesichert werden soll:
backup        /home/tux/Dokumente/            localhost/
backup        /etc/           localhost/
backup        lvm://vg1/root/ localhost/root/

linux_lvm_cmd_lvcreate        /sbin/lvcreate
linux_lvm_cmd_lvremove        /sbin/lvremove
linux_lvm_snapshotsize        2G
linux_lvm_snapshotname        rsnapshot-tmp
linux_lvm_vgpath      /dev
linux_lvm_mountpath   /mnt/rsnapshot-tmp
linux_lvm_cmd_mount   /bin/mount
linux_lvm_cmd_umount  /bin/umount
Zum Testen Konfigration: rsnapshot configtest
Manuelles ausführen: rsnapshot daily
Topic 205: Network Configuration
205.1 Basic networking configuration
Siehe dazu:
https://de.wikibooks.org/wiki/Linux-Praxisbuch:_WLAN_unter_Linux
https://en.wikipedia.org/wiki/Comparison_of_open-source_wireless_drivers
https://wiki.debianforum.de/WLAN-Access-Point_mit_hostapd_und_USB-Stick
Probleme machen immer wieder Closed Source Treiber!
root@gast2:~# apt-cache search iwl
root@gast2:~#
root@gast2:~# vi /etc/apt/sources.list
root@gast2:~#
root@gast2:~# grep non-free /etc/apt/sources.list
deb http://ftp.tu-chemnitz.de/pub/linux/debian/debian/ jessie main contrib non-free
root@gast2:~#
root@gast2:~# apt-get update
...
root@gast2:~#
root@gast2:~# apt-cache search iwl
firmware-iwlwifi - Binary firmware for Intel Wireless cards
root@gast2:~#
root@gast2:~# iwconfig
eth0      no wireless extensions.

tap0      no wireless extensions.

lo        no wireless extensions.

root@gast2:~#
Wenn dann ein Interface ‚wlan0‘ vorhanden ist, kann die Umgebung mit iwlist scan gesannt werden.
Ein paar Fragen dazu:
QUESTION 28
Which ONE of the following wireless tools can be used to check the wireless network link quality?
A. iwconfig
B. iwlink
C. iwscan
D. iwifi
Correct Answer: A


QUESTION 39 (LPI.Test-king.117-201.v2015-04-03.by.Lucile.74q.pdf)
Real 25
LPI 117-201 Exam
Which of the following wireless tools can be used to check the wireless network link quality? (Choose TWO
correct answers.)
A. iwconfig
B. iwlink
C. iwscan
D. iwifi
E. iw
Correct Answer: AE

QUESTION 8 (LPI.117-201.BrainDump.v2013-02-03.pdf)
Which TWO of the following wireless tools can be used to check the wireless network link quality?
A. iwconfig
B. iwlink
C. iwscan
D. iwifi
E. iwspy
Correct Answer: AE
Siehe dazu auch
205.2 Advanced Network Configuration and Troubleshooting
IP-Aliase und Routingsregeln
root@host:~ # # Im selben Segment:
root@host:~ #
root@host:~ # ifconfig eth0:0 195.0.0.1/30 up
root@host:~ #
root@host:~ # ping -c3 195.0.0.2
PING 195.0.0.2 (195.0.0.2) 56(84) bytes of data.
64 bytes from 195.0.0.2: icmp_seq=1 ttl=64 time=1.03 ms
64 bytes from 195.0.0.2: icmp_seq=2 ttl=64 time=0.622 ms
64 bytes from 195.0.0.2: icmp_seq=3 ttl=64 time=1.08 ms

--- 195.0.0.2 ping statistics ---
3 packets transmitted, 3 received, 0% packet loss, time 2000ms
rtt min/avg/max/mdev = 0.622/0.916/1.089/0.208 ms
root@host:~ #
root@host:~ #
root@host:~ #
root@host:~ # # Im zweiten Teilnetz:
root@host:~ # ifconfig eth0:0 195.0.0.5/30 up
root@host:~ #
root@host:~ # ping -c3 195.0.0.2
PING 195.0.0.2 (195.0.0.2) 56(84) bytes of data.

--- 195.0.0.2 ping statistics ---
3 packets transmitted, 0 received, 100% packet loss, time 2015ms

root@host:~ # route -n
Kernel-IP-Routentabelle
Ziel            Router          Genmask         Flags Metric Ref    Use Iface
0.0.0.0         10.22.15.1      0.0.0.0         UG    0      0        0 eth0
10.2.2.0        0.0.0.0         255.255.255.0   U     0      0        0 tap0
10.22.15.0      0.0.0.0         255.255.255.0   U     0      0        0 eth0
195.0.0.4       0.0.0.0         255.255.255.252 U     0      0        0 eth0
root@host:~ #
Um das benachbarte Netz zu erreichen, muss diese Regel gesetzt werden, wobei wir in unserer Übung den eigenen Host als Gateway angeben müssen (direkt auf dem Kabel, kein Router dazwischen):
root@host:~ # route add -net 195.0.0.0 netmask 255.255.255.252 gw 195.0.0.5
Eine Host-Route hinzufügen
Stellen wir uns vor, unsere Maschine „UBUNTU“ stehe unter permanenten DoS-Angriffen, die vom Angreifer auf 10.3.3.254 („devil-vm“) ausgehen. Mit der Host-Route route add -host 10.3.3.254 gw 127.0.0.1, lassen wir alle Datenpakete von dieser bösen Maschine gegen 127.0.0.1 laufen, blockieren sie also:
my@bash $ route -n
Kernel-IP-Routentabelle
Ziel            Router          Genmask         Flags Metric Ref    Use Iface
0.0.0.0         192.168.2.1     0.0.0.0         UG    100    0        0 enp0s3
10.3.3.0        0.0.0.0         255.255.255.0   U     0      0        0 enp0s3
169.254.0.0     0.0.0.0         255.255.0.0     U     1000   0        0 enp0s3
192.168.2.0     0.0.0.0         255.255.255.0   U     100    0        0 enp0s3
192.168.5.0     0.0.0.0         255.255.255.0   U     101    0        0 enp0s8
my@bash $
my@bash $

    devil-vm>>>
    devil-vm>>> ip -4 addr show dev eth0
    2: eth0: <BROADCAST,MULTICAST,UP,LOWER_UP> mtu 1500 qdisc pfifo_fast state UP group default qlen 1000
        inet 192.168.2.108/24 brd 192.168.2.255 scope global dynamic eth0
        valid_lft 1794691sec preferred_lft 1794691sec
        inet 10.3.3.254/24 brd 10.3.3.255 scope global eth0:subdev0
        valid_lft forever preferred_lft forever
    devil-vm>>>
    devil-vm>>>
    devil-vm>>> ping -c6 -s 666 -p deadbeef 10.3.3.4
    PATTERN: 0xdeadbeef
    PING 10.3.3.4 (10.3.3.4) 666(694) bytes of data.
    674 bytes from 10.3.3.4: icmp_seq=1 ttl=64 time=0.432 ms
    674 bytes from 10.3.3.4: icmp_seq=2 ttl=64 time=0.414 ms
    674 bytes from 10.3.3.4: icmp_seq=3 ttl=64 time=0.404 ms
    674 bytes from 10.3.3.4: icmp_seq=4 ttl=64 time=0.287 ms
    674 bytes from 10.3.3.4: icmp_seq=5 ttl=64 time=0.535 ms
    674 bytes from 10.3.3.4: icmp_seq=6 ttl=64 time=0.342 ms

    --- 10.3.3.4 ping statistics ---
    6 packets transmitted, 6 received, 0% packet loss, time 120ms
    rtt min/avg/max/mdev = 0.287/0.402/0.535/0.078 ms
    devil-vm>>>
    devil-vm>>> ##   >> Noch geht es, aber nicht mehr lange!

my@bash $
my@bash $ ## Hostroute setzen (LPI-relevant!):
my@bash $ route add -host 10.3.3.254 gw 127.0.0.1
my@bash $
my@bash $ route -n
Kernel-IP-Routentabelle
Ziel            Router          Genmask         Flags Metric Ref    Use Iface
0.0.0.0         192.168.2.1     0.0.0.0         UG    100    0        0 enp0s3
10.3.3.0        0.0.0.0         255.255.255.0   U     0      0        0 enp0s3
10.3.3.254      127.0.0.1       255.255.255.255 UGH   0      0        0 lo
169.254.0.0     0.0.0.0         255.255.0.0     U     1000   0        0 enp0s3
192.168.2.0     0.0.0.0         255.255.255.0   U     100    0        0 enp0s3
192.168.5.0     0.0.0.0         255.255.255.0   U     101    0        0 enp0s8
my@bash $
my@bash $ ##   >> "UGH" = route is Up, with Gateway and only to one Host
my@bash $

    devil-vm>>>
    devil-vm>>> ping -c6 -s 666 -p deadbeef 10.3.3.4
    PATTERN: 0xdeadbeef
    PING 10.3.3.4 (10.3.3.4) 666(694) bytes of data.

    --- 10.3.3.4 ping statistics ---
    6 packets transmitted, 0 received, 100% packet loss, time 119ms

    devil-vm>>>
    devil-vm>>> ##   >> Oh weh: 100% Verlust,  - zur Freude des leidgeplagten UBUNTU-Hosts.  :-)


my@bash $ ## UBUNTU: Löschen der Regel:
my@bash $ route del -host 10.3.3.254 gw 127.0.0.1
my@bash $

    devil-vm>>>
    devil-vm>>> ping -c666 -s 666 -p deadbeef 10.3.3.4

      ##   - und schon läuft der Ping wieder los -

    PING 10.3.3.4 (10.3.3.4) 666(694) bytes of data.
    674 bytes from 10.3.3.4: icmp_seq=12 ttl=64 time=0.382 ms
    674 bytes from 10.3.3.4: icmp_seq=13 ttl=64 time=0.347 ms
    674 bytes from 10.3.3.4: icmp_seq=14 ttl=64 time=0.315 ms
    674 bytes from 10.3.3.4: icmp_seq=15 ttl=64 time=0.345 ms
    674 bytes from 10.3.3.4: icmp_seq=16 ttl=64 time=0.325 ms
    674 bytes from 10.3.3.4: icmp_seq=17 ttl=64 time=0.348 ms
    ^C
    --- 10.3.3.4 ping statistics ---
    17 packets transmitted, 6 received, 64.7059% packet loss, time 405ms
    rtt min/avg/max/mdev = 0.315/0.343/0.382/0.030 ms
    devil-vm>>>
    devil-vm>>> ##   >> Aber mit Verlust: 64.7059%
Sinnvollerweise werden Host-Routen bei der Interneteinwahl via PPP verwendet: So auch bei PPPoE (DSL). -> pppd ist der andere „Point“, der dem Client die Host-Route zuweist. => http://www.linuxhaven.de/dlhp/HOWTO/DE-PPP-HOWTO-21.html
Paketanalyzer
Hier handelt es sich eigentlich nicht um „Sniffer“, die speziell z.B. nach Passwörtern suchen, sondern um allgemeine Analysetools.
Es gibt zwei wichtige Vertreter:
Wireshark (früher „Ethereal“, = GUI Application)
tcpdump (Cmdline, für Embedded geeignet, die capture-Filtersprache wird auch bei Wireshark eingesetzt)
Hier ein paar einfache Kommandozeilen für tcpdump:
Ohne Namensauflösung an eth0 lauschen:
tcpdump -n -i eth0Weiterhin nur den Host 10.0.0.1 beobachten:
tcpdump -n -i eth0 host 10.0.0.1Speziell als DeSTination Host beobachten:
tcpdump -n -i eth0 dst host 10.0.0.1Speziell als SouRCe Host beobachten:
tcpdump -n -i eth0 src host 10.0.0.1Zusätzlich das Protokoll eingrenzen (log. UND):
tcpdump -n -i eth0 host 10.0.0.1 and icmpAn allen Schnittstellen Infos über den Zielport 22 sammeln:
tcpdump -n dst port 22An allen Schnittstellen Infos über ein Quellnetz sammeln:
tcpdump -n src net 10.0.0.0/24
Weitere wichtige Optionen sind außerdem:
Hexdump des Paketinhaltes ausgeben:
-xASCII-Dump des Paketinhaltes ausgeben:
-AAusgabe in eine Datei schreiben (PCAP-Format):
-w datei.cap
Weitere Hinweise und Beispiele:
Ping und Tcpdump, um VPNs zu überprüfen
Die IP-Adresse ‚80.22.33.44‘ stelle die öffentlich erreichbare Adresse eines Servers dar. Man kann sie nun mittels ‚ping‘ ganz einfach ein Pattern als Nutzlast mitgeben:
root@host:~ # ping -c1 80.22.33.44 -p deadbeef
PATTERN: 0xdeadbeef
PING 80.22.33.44 (80.22.33.44) 56(84) bytes of data.
64 bytes from 80.22.33.44: icmp_seq=1 ttl=55 time=39.9 ms

--- 80.22.33.44 ping statistics ---
1 packets transmitted, 1 received, 0% packet loss, time 0ms
rtt min/avg/max/mdev = 39.938/39.938/39.938/0.000 ms
root@host:~ #
Wenn hierbei nichts verschlüsselt wird, ist natürlich dieses Muster deutlich zu erkennen, d.h. es wird an dieser Stelle alles mitzulesen sein:
root@host:~ # tcpdump -i eth0 -n -x host 80.22.33.44
tcpdump: verbose output suppressed, use -v or -vv for full protocol decode
listening on eth0, link-type EN10MB (Ethernet), capture size 262144 bytes
12:58:07.998317 IP 10.22.15.131 > 80.22.33.44: ICMP echo request, id 3897, seq 1, length 64
  0x0000:  4500 0054 f676 4000 4001 2150 0a16 0f83
  0x0010:  c39a 45af 0800 2edf 0f39 0001 4f2a 8f58
  0x0020:  0000 0000 a43b 0f00 0000 0000 dead beef
  0x0030:  dead beef dead beef dead beef dead beef
  0x0040:  dead beef dead beef dead beef dead beef
  0x0050:  dead beef
12:58:08.038246 IP 80.22.33.44 > 10.22.15.131: ICMP echo reply, id 3897, seq 1, length 64
  0x0000:  4500 0054 f947 0000 3701 677f c39a 45af
  0x0010:  0a16 0f83 0000 36df 0f39 0001 4f2a 8f58
  0x0020:  0000 0000 a43b 0f00 0000 0000 dead beef
  0x0030:  dead beef dead beef dead beef dead beef
  0x0040:  dead beef dead beef dead beef dead beef
  0x0050:  dead beef
^C
2 packets captured
2 packets received by filter
0 packets dropped by kernel
root@host:~ #
Sinnvoll ist hier u.U. das Capture-Filter ... and not port 22 mitzugeben. Nämlich immer dann, wenn man sich per SSH auf seinen entfernten Host eingeloggt hat, und von da aus einen bestimmten Host beobachen möchte, dabei aber nicht seinen eigenen, selbst verursachten SSH-Datenverkehr aufzeichnen möchte.
205.3 Troubleshooting Network Issues
Datenpaketgrößen nur zum Größenvergleich:
ATM: Zellen zu a‘ 53 Byte
Ethernet: Frames zu a‘ 1500 Byte
Ermittlung des Path-MTU-Wertes für ein bestimmtes Ziel:
Bequem mit ‚tracepath‘:
root@gast2:~# ## apt-get install iputils-tracepath
root@gast2:~#
root@gast2:~# dpkg -L iputils-tracepath | grep bin
/usr/bin
/usr/bin/traceroute6.iputils
/usr/bin/tracepath
/usr/bin/tracepath6
root@gast2:~#
root@gast2:~# tracepath 10.22.15.128
1?: [LOCALHOST]                                         pmtu 1500
1:  10.22.15.128                                          0.569ms reached
1:  10.22.15.128                                          0.209ms reached
    Resume: pmtu 1500 hops 1 back 1
root@gast2:~#
Umständlich mit ‚ping‘:
root@gast2:~# ping -c2 -s1500  -M do 10.22.15.128
PING 10.22.15.128 (10.22.15.128) 1500(1528) bytes of data.
ping: local error: Message too long, mtu=1500
ping: local error: Message too long, mtu=1500

--- 10.22.15.128 ping statistics ---
2 packets transmitted, 0 received, +2 errors, 100% packet loss, time 1000ms

root@gast2:~#


root@gast2:~# ping -c2 -s1472  -Mdo 10.22.15.128
PING 10.22.15.128 (10.22.15.128) 1472(1500) bytes of data.
1480 bytes from 10.22.15.128: icmp_seq=1 ttl=64 time=0.271 ms
1480 bytes from 10.22.15.128: icmp_seq=2 ttl=64 time=0.258 ms

--- 10.22.15.128 ping statistics ---
2 packets transmitted, 2 received, 0% packet loss, time 1000ms
rtt min/avg/max/mdev = 0.258/0.264/0.271/0.017 ms
root@gast2:~#
Topic 206: System Maintenance
206.1 Make and install programs from source
Nach dem Herunterladen und Entpacken eines Quelltext-Softwarepakets, was in der Unix-Welt oft als Tarball erhältlich ist, führt man i.d.R. in dem Quelltextverzeichnis folgende 3 Schritte aus:
Software konfigurieren:
./configure --prefix /usr/localSoftware kompilieren:
makeSoftware an Ort und Stelle bringen:
make install
ACHTUNG: Aus Sicherheitsgründen sollte nur der letzte Schritt als root ausgeführt werden! Zum Konfigurieren und Bauen der Software reichen normale Nutzerrechte aus.
Eine komplexere Anwendung installieren
root@deb8:~# wget https://www.lesbonscomptes.com/recoll/recoll-1.22.4.tar.gz
--2017-02-01 11:10:50--  https://www.lesbonscomptes.com/recoll/recoll-1.22.4.tar.gz
Auflösen des Hostnamen »www.lesbonscomptes.com (www.lesbonscomptes.com)«... 62.210.16.61
Verbindungsaufbau zu www.lesbonscomptes.com (www.lesbonscomptes.com)|62.210.16.61|:443... verbunden.
HTTP-Anforderung gesendet, warte auf Antwort... 200 OK
Länge: 2511949 (2,4M) [application/x-gzip]
In »»recoll-1.22.4.tar.gz«« speichern.

recoll-1.22.4.tar.gz         100%[==============================================>]   2,40M  7,78MB/s   in 0,3s

2017-02-01 11:10:50 (7,78 MB/s) - »»recoll-1.22.4.tar.gz«« gespeichert [2511949/2511949]

root@deb8:~#
root@deb8:~#
root@deb8:~# apt-get install stow
...


root@deb8:~# ### http://linuxwiki.de/Stow
root@deb8:~#
root@deb8:~#
root@deb8:~# tar xf recoll-1.22.4.tar.gz
root@deb8:~#
root@deb8:~# cd recoll-1.22.4/
root@deb8:~/recoll-1.22.4#
root@deb8:~/recoll-1.22.4# du -sh
11M .
root@deb8:~/recoll-1.22.4# ./configure --prefix=/usr/local/stow/recoll-1.22.4


- FEHLER bezüglich aspell und libxapian -


apt-get install libaspell-dev libxapian-dev


./configure --prefix=/usr/local/stow/recoll-1.22.4

    - Fehler bezüglich inotify/FAM -
Wir erkunden die Möglichkeiten:
root@deb8:~/recoll-1.22.4# ./configure --help | grep -i fam
--with-fam              Use File Alteration Monitor for almost real time
                        indexing of modified files. Give the fam/gamin
                        library as argument (ie: /usr/lib/libfam.so) if
root@deb8:~/recoll-1.22.4#

./configure --prefix=/usr/local/stow/recoll-1.22.4 --with-fam=no


    - Fehler bezüglich qmake -


$ apt-get install qt4-qmake


$ ./configure --prefix=/usr/local/stow/recoll-1.22.4 --with-fam=no
...
config.status: creating Makefile
config.status: creating common/rclversion.h
config.status: creating python/recoll/setup.py
config.status: creating python/recoll/Makefile
config.status: creating common/autoconfig.h
config.status: executing depfiles commands
config.status: executing libtool commands
root@deb8:~/recoll-1.22.4# echo $?
0
root@deb8:~/recoll-1.22.4#


$ make


    - Wieder viele Fehlermeldungen -

g++ -DHAVE_CONFIG_H -I. -I./common  -Wall -Wno-unused -I. -I./aspell -I./bincimapmime -I./common -I./index -I./internfile
mv -f $depbase.Tpo $depbase.Po
utils/x11mon.cpp:7:22: fatal error: X11/Xlib.h: Datei oder Verzeichnis nicht gefunden
#include <X11/Xlib.h>
                    ^
compilation terminated.
Makefile:1561: recipe for target 'utils/x11mon.o' failed
make[1]: *** [utils/x11mon.o] Error 1
make[1]: Leaving directory '/root/recoll-1.22.4'
Makefile:1022: recipe for target 'all' failed
make: *** [all] Error 2
root@deb8:~/recoll-1.22.4#
root@deb8:~/recoll-1.22.4#
root@deb8:~/recoll-1.22.4# apt-cache search xlib | grep dev
libghc-x11-dev - Haskell-X11-Anbindung für GHC
libglu1-mesa-dev - OpenGL Utility Library (GLU) von Mesa -- Entwicklungsdateien
libx11-dev - Bibliothek für die X11-Client-Schnittstelle (Entwicklungs-Header)
...


$ apt-get install libx11-dev
$ ./configure --prefix=/usr/local/stow/recoll-1.22.4 --with-fam=no --disable-python-module

- Fehler -

$ apt-get install libqt4-dev libqt4-dev-bin
$ make
$ make install
Schließlich installieren wir die Software mit Hilfe von ‚stow‘, was im Prinzip nur Symlinks setzt (siehe http://linuxwiki.de/Stow):
$ root@deb8:/usr/local/stow#
root@deb8:/usr/local/stow# date
Mi 1. Feb 11:47:16 CET 2017
root@deb8:/usr/local/stow#
root@deb8:/usr/local/stow# man stow
root@deb8:/usr/local/stow#
root@deb8:/usr/local/stow# stow -v recoll-1.22.4/
Possible precedence issue with control flow operator at /usr/share/perl5/Stow.pm line 1736.
LINK: share/appdata => ../stow/recoll-1.22.4/share/appdata
LINK: share/icons => ../stow/recoll-1.22.4/share/icons
LINK: share/pixmaps => ../stow/recoll-1.22.4/share/pixmaps
LINK: share/applications => ../stow/recoll-1.22.4/share/applications
LINK: share/recoll => ../stow/recoll-1.22.4/share/recoll
LINK: share/man/man1 => ../../stow/recoll-1.22.4/share/man/man1
LINK: share/man/man5 => ../../stow/recoll-1.22.4/share/man/man5
LINK: lib/recoll => ../stow/recoll-1.22.4/lib/recoll
LINK: bin/recollindex => ../stow/recoll-1.22.4/bin/recollindex
LINK: bin/recoll => ../stow/recoll-1.22.4/bin/recoll
root@deb8:/usr/local/stow#
Tipps:
Ein schlanker und trotzdem komfortabler Webserver: XS-Httpd, siehe https://github.com/gletsjer/xshttpd/blob/master/INSTALL
206.2 Backup operations
Software-Tipps:
Pattformunabhängig: bacula / bareos (Linux-Vorgänger: amanda)
Heißer Tipp für Linux/Mac: borgbackup (GUI: „vorta“ siehe https://www.linuxuprising.com/2019/02/securely-and-efficiently-backup-data-on.html)
Für virtuelle Maschinen: https://chemnitzer.linux-tage.de/2016/de/programm/beitrag/272
Linux und VMs komplett sichern: http://backdrift.org/xen-backup-simple-backups-with-lvm-and-rsnapshot
Windows: http://www.alexosoft.de/de/produkte/backup-service-home/
Zu den Sicherungsarten siehe http://www.versionbackup.de/backup-verfahren.html
Wichtige Linux-Werkzeuge:
tar / mt
rsync / rsyncd (vom Samba-Team: Spiegelung PDC => BDC)
Spiegelung mit rsync
Auf dem Client wollen wir uns zuerst die Daten von der entfernten Quelle herunterladen. ACHTUNG: Nur beim ersten Aufruf sollte der endende Slash beim Quellpfad weggelassen werden. Das hat den Sinn, dass der Ordner (hier ‚data‘) als Unterverzeichnis auf dem Ziel initial abgelegt wird. Beim ersten Mal wollen wir außerdem vorsichtig sein, und verwenden die Option -n, –dry-run`, simulieren das Ganze also nur:
my@bash $ ip -4 addr show eth0
2: eth0: <BROADCAST,MULTICAST,UP,LOWER_UP> mtu 1500 qdisc pfifo_fast state UP group default qlen 1000
    inet 10.22.15.168/24 brd 10.22.15.255 scope global eth0
valid_lft forever preferred_lft forever
my@bash $
my@bash $ mkdir /srv/backup
my@bash $
my@bash $ chmod 700 /srv/backup
my@bash $
my@bash $ rsync -n -avH tux@10.22.15.131:/srv/data /src/backup/
tux@10.22.15.131’s password:
receiving incremental file list
created directory /src/backup
data/
data/host.conf
data/hostname
data/hosts
data/hosts.allow
data/hosts.deny

sent 39 bytes  received 152 bytes  54.57 bytes/sec
total size is 1,403  speedup is 7.35 (DRY RUN)
my@bash $ ##    >> Das war nur eine Simulation dank der Option '-n'!
Jetzt wird es ernst, wir lassen die Option -n weg:
my@bash $ rsync -avH tux@10.22.15.131:/srv/data /srv/backup
tux@10.22.15.131's password:
receiving incremental file list
data/
data/host.conf
data/hostname
data/hosts
data/hosts.allow
data/hosts.deny

sent 123 bytes  received 1,759 bytes  752.80 bytes/sec
total size is 1,403  speedup is 0.75
my@bash $
my@bash $ ls -l /srv/backup/
insgesamt 4
drwxr-xr-x 2 root root 4096 Feb  2 11:14 data
my@bash $ ls -l /srv/backup/data/
insgesamt 20
-rw-r--r-- 1 root root   9 Feb  2 11:14 host.conf
-rw-r--r-- 1 root root   6 Feb  2 11:14 hostname
-rw-r--r-- 1 root root 266 Feb  2 11:14 hosts
-rw-r--r-- 1 root root 411 Feb  2 11:14 hosts.allow
-rw-r--r-- 1 root root 711 Feb  2 11:14 hosts.deny
my@bash $ ##    >> Jetzt wurde die Aktion durchgeführt, kein "(DRY RUN)" mehr!
Nun läuft es umgekehrt ab - wir laden die Daten hoch; der entfernte Rechner ist das Ziel. Wie wir aber sehen werden, reichen die Rechte unseres Backup-Benutzers ‚tux‘ nicht aus:
my@bash $ rsync -avH /srv/backup/data/ tux@10.22.15.131:/srv/data/
sending incremental file list
liesmich.txt
rsync: mkstemp "/srv/data/.liesmich.txt.5cKxzH" failed: Permission denied (13)

sent 251 bytes  received 118 bytes  738.00 bytes/sec
total size is 314,574,218  speedup is 852,504.66
rsync error: some files/attrs were not transferred (see previous errors) (code 23) at main.c(1183) [sender=3.1.1]
my@bash $
Auf dem Server:
root@host:~ # ls -la /srv/data/
insgesamt 307240
drwxr-xr-x 2 root root      4096 Feb  2 11:27 .
drwxr-xr-x 4 root root      4096 Feb  2 11:13 ..
-rw-r--r-- 1 root root 314572800 Feb  2 11:28 bigdata.txt
-rw-r--r-- 1 root root         9 Feb  2 11:14 host.conf
-rw-r--r-- 1 root root         6 Feb  2 11:14 hostname
-rw-r--r-- 1 root root       266 Feb  2 11:14 hosts
-rw-r--r-- 1 root root       411 Feb  2 11:14 hosts.allow
-rw-r--r-- 1 root root       711 Feb  2 11:14 hosts.deny
root@host:~ #
root@host:~ # ### Rechteproblem auf dem Target!
root@host:~ #
root@host:~ # #   >>> bitte beheben <<<

DIE LÖSUNG: 'chown tux /srv/data/'
Mit (optionaler) Angabe des gewünschten remote Shell Kommandos (aus der Man-Page: ‚-e, –rsh=COMMAND => specify the remote shell to use‘)
my@bash $ rsync -avH -e '/usr/bin/ssh' tux@10.22.15.131:/srv/data/ /srv/backup/data/
receiving incremental file list

sent 20 bytes  received 152 bytes  114.67 bytes/sec
total size is 314,574,203  speedup is 1,828,919.78
AUFGABE Rsyncd einrichten